要約
マイクロプロセッサは、本来のバスマスター(DS2480B、DS2482製品ファミリなど)が存在しない場合でも、容易に1-Wire®のタイミング信号を生成することができます。このアプリケーションノートでは、「C」で記述した基本的な標準速度の1-Wireマスターの通信ルーチンの例を紹介します。1-Wireバスの4つの基本オペレーションは、「リセット」、「ビット1の書き込み」、「ビット0の書き込み」、および「ビットの読み取り」です。バイト単位の機能は、ビットオペレーションを複数回呼び出すことによって得ることができます。時間値を設けることによって、さまざまな回線状態においてすべての1-Wireデバイスとの通信が可能な、最も堅牢な1-Wireマスターを作ることができます。
はじめに
マイクロプロセッサは、専用のバスマスターが存在しない場合でも、容易に1-Wireのタイミング信号を生成することができます。このアプリケーションノートでは、「C」で記述した基本的な標準速度の1-Wireマスターの通信ルーチンの例を紹介します。オーバドライブの通信速度についても、このアプリケーションノートで説明します。以下に、サンプルコードを正しく動作させるために必要なシステム要件をいくつか示します。
- 通信ポートは双方向で、出力はオープンドレイン、かつライン上に弱プルアップがなければなりません。これは、すべての1-Wireバスの要件になります。1-Wireマスターのマイクロプロセッサ回路の簡単な例については、アプリケーションノート4206 「組込みアプリケーション用の正しい1-Wire®マスターの選択」のカテゴリ1を参照してください。
- システムは、高精度で再現性のある1µsの遅延(標準速度の場合)、および0.25µsの遅延(オーバドライブ速度の場合)を生成できる必要があります。
- 生成中に通信動作を中断してはなりません。
1-Wireバスの4つの基本オペレーションは、「リセット」、「ビット1の書き込み」、「ビット0の書き込み」、および「ビットの読み取り」です。1ビットの通信を行うのに必要な時間は、デバイスデータシートではタイムスロットと呼ばれています。バイト単位の機能は、ビットオペレーションを複数回呼び出すことによって得ることができます。各オペレーションの簡単な説明とその生成に必要な手順の一覧については、下記の表1を参照してください。図1では、波形を図で表しています。表2は、一般的な回線状態において1-Wireマスターが1-Wireデバイスと通信する場合の、推奨タイミングを示しています。デバイスと回線状態の特定のセットに限定して1-Wireマスターを使用するのであれば、これに代わる値を使用することができます。ダウンロード可能なワークシートを参照し、システムおよびデバイスパラメータを入力して最小値と最大値を決定してください。
| Operation | Description | Implementation |
| Write 1 bit | Send a '1' bit to the 1-Wire slaves (Write 1 time slot) | Drive bus low, delay A Release bus, delay B |
| Write 0 bit | Send a '0' bit to the 1-Wire slaves (Write 0 time slot) | Drive bus low, delay C Release bus, delay D |
| Read bit | Read a bit from the 1-Wire slaves (Read time slot) | Drive bus low, delay A Release bus, delay E Sample bus to read bit from slave Delay F |
| Reset | Reset the 1-Wire bus slave devices and ready them for a command | Delay G Drive bus low, delay H Release bus, delay I Sample bus, 0 = device(s) present, 1 = no device present Delay J |
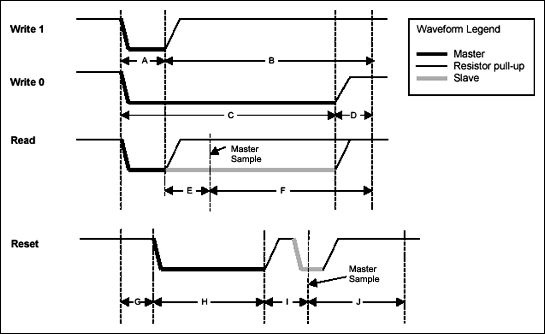
図1. 1-Wireの波形
| Parameter | Speed | Recommended (µs) |
| A | Standard | 6 |
| Overdrive | 1.0 | |
| B | Standard | 64 |
| Overdrive | 7.5 | |
| C | Standard | 60 |
| Overdrive | 7.5 | |
| D | Standard | 10 |
| Overdrive | 2.5 | |
| E | Standard | 9 |
| Overdrive | 1.0 | |
| F | Standard | 55 |
| Overdrive | 7 | |
| G | Standard | 0 |
| Overdrive | 2.5 | |
| H | Standard | 480 |
| Overdrive | 70 | |
| I | Standard | 70 |
| Overdrive | 8.5 | |
| J | Standard | 410 |
| Overdrive | 40 |
これらの値を計算するためのワークシートは、ダウンロード可能です。
サンプルコード
以下のサンプルコードでは、一般的な2つの「C」関数outpとinpを利用して、入出力(I/O)ポート位置にデータバイトの書き込みと読み出しを行っています。これらの関数は通常、<conio.h>標準ライブラリにあります。これらの関数の代わりに、プラットフォームの該当する関数を使用してもかまいません。
// send 'databyte' to 'port'
int outp(unsigned port, int databyte);

// read byte from 'port'
int inp(unsigned port);
コード内の定数PORTADDRESS(図3を参照)は、通信ポートの位置として定義されています。このコードでは、この位置のビット0が1-Wireバスを制御するものと想定しています。このビットを0に設定すると、1-Wireラインがローになります。このビットを1に設定すると1-Wireが開放され、抵抗プルアップによってプルアップされるか、あるいは1-Wireスレーブデバイスによってプルダウンされます。
コード内の関数tickDelayはユーザ生成ルーチンであり、不定秒数(1/4マイクロ秒単位)の間だけ待機するものです。この関数は、動作する固有のハードウェアプラットフォームごとに異なるため、ここでは実装していません。以下は、関数SetSpeedとともにtickDelayの関数宣言を示しています。これは、推奨される標準速度とオーバドライブ速度の刻み値を設定するものです。
例1. 1-Wireのタイミング生成
// Pause for exactly 'tick' number of ticks = 0.25us
void tickDelay(int tick); // Implementation is platform specific

// 'tick' values
int A,B,C,D,E,F,G,H,I,J;

//-----------------------------------------------------------------------------
// Set the 1-Wire timing to 'standard' (standard=1) or 'overdrive' (standard=0).
//
void SetSpeed(int standard)
{
        // Adjust tick values depending on speed
        if (standard)
        {
                // Standard Speed
                A = 6 * 4;
                B = 64 * 4;
                C = 60 * 4;
                D = 10 * 4;
                E = 9 * 4;
                F = 55 * 4;
                G = 0;
                H = 480 * 4;
                I = 70 * 4;
                J = 410 * 4;
        }
        else
        {
                // Overdrive Speed
                A = 1.5 * 4;
                B = 7.5 * 4;
                C = 7.5 * 4;
                D = 2.5 * 4;
                E = 0.75 * 4;
                F = 7 * 4;
                G = 2.5 * 4;
                H = 70 * 4;
                I = 8.5 * 4;
                J = 40 * 4;
        }
}
下記の例2は、1-Wireの基本オペレーションのサンプルコードを示しています。
例2. 1-Wireの基本関数
//-----------------------------------------------------------------------------
// Generate a 1-Wire reset, return 1 if no presence detect was found,
// return 0 otherwise.
// (NOTE: Does not handle alarm presence from DS2404/DS1994)
//
int OWTouchReset(void)
{
        int result;

        tickDelay(G);
        outp(PORTADDRESS,0x00); // Drives DQ low
        tickDelay(H);
        outp(PORTADDRESS,0x01); // Releases the bus
        tickDelay(I);
        result = inp(PORTADDRESS) ^ 0x01; // Sample for presence pulse from slave
        tickDelay(J); // Complete the reset sequence recovery
        return result; // Return sample presence pulse result
}

//-----------------------------------------------------------------------------
// Send a 1-Wire write bit. Provide 10us recovery time.
//
void OWWriteBit(int bit)
{
        if (bit)
        {
                // Write '1' bit
                outp(PORTADDRESS,0x00); // Drives DQ low
                tickDelay(A);
                outp(PORTADDRESS,0x01); // Releases the bus
                tickDelay(B); // Complete the time slot and 10us recovery
        }
        else
        {
                // Write '0' bit
                outp(PORTADDRESS,0x00); // Drives DQ low
                tickDelay(C);
                outp(PORTADDRESS,0x01); // Releases the bus
                tickDelay(D);
        }
}

//-----------------------------------------------------------------------------
// Read a bit from the 1-Wire bus and return it. Provide 10us recovery time.
//
int OWReadBit(void)
{
        int result;

        outp(PORTADDRESS,0x00); // Drives DQ low
        tickDelay(A);
        outp(PORTADDRESS,0x01); // Releases the bus
        tickDelay(E);
        result = inp(PORTADDRESS) & 0x01; // Sample the bit value from the slave
        tickDelay(F); // Complete the time slot and 10us recovery

        return result;
}
上記はすべて、1-Wireバスをビット単位で操作する場合のものです。例3に示すように、上記のルーチンをベースとしてバイト単位のマニピュレータ関数を作成することができます。
例3. 導出された1-Wireの関数
//-----------------------------------------------------------------------------
// Write 1-Wire data byte
//
void OWWriteByte(int data)
{
        int loop;

        // Loop to write each bit in the byte, LS-bit first
        for (loop = 0; loop < 8; loop++)
        {
                OWWriteBit(data & 0x01);

                // shift the data byte for the next bit
                data >>= 1;
        }
}

//-----------------------------------------------------------------------------
// Read 1-Wire data byte and return it
//
int OWReadByte(void)
{
        int loop, result=0;

        for (loop = 0; loop < 8; loop++)
        {
                // shift the result to get it ready for the next bit
                result >>= 1;

                // if result is one, then set MS bit
                if (OWReadBit())
                        result |= 0x80;
        }
        return result;
}

//-----------------------------------------------------------------------------
// Write a 1-Wire data byte and return the sampled result.
//
int OWTouchByte(int data)
{
        int loop, result=0;

        for (loop = 0; loop < 8; loop++)
        {
                // shift the result to get it ready for the next bit
                result >>= 1;

                // If sending a '1' then read a bit else write a '0'
                if (data & 0x01)
                {
                        if (OWReadBit())
                                result |= 0x80;
                }
                else
                        OWWriteBit(0);

                // shift the data byte for the next bit
                data >>= 1;
        }
        return result;
}

//-----------------------------------------------------------------------------
// Write a block 1-Wire data bytes and return the sampled result in the same
// buffer.
//
void OWBlock(unsigned char *data, int data_len)
{
        int loop;

        for (loop = 0; loop < data_len; loop++)
        {
                data[loop] = OWTouchByte(data[loop]);
        }
}

//-----------------------------------------------------------------------------
// Set all devices on 1-Wire to overdrive speed. Return '1' if at least one
// overdrive capable device is detected.
//
int OWOverdriveSkip(unsigned char *data, int data_len)
{
        // set the speed to 'standard'
        SetSpeed(1);

        // reset all devices
        if (OWTouchReset()) // Reset the 1-Wire bus
                return 0; // Return if no devices found

        // overdrive skip command
        OWWriteByte(0x3C);

        // set the speed to 'overdrive'
        SetSpeed(0);

        // do a 1-Wire reset in 'overdrive' and return presence result
        return OWTouchReset();
}
owTouchByteオペレーションは、1-Wireバスから同時に書き込みと読み取りを行います。この関数は、書き込みと読み取りの両方のブロックが構築されるように作成されています。これは特定のプラットフォームでより効果的で、マキシム製のAPIで広く使用されています。OWBlock関数は、OWTouchByte関数を使用して、単に1-Wireにデータのブロックを送受信するだけです。OWTouchByte(0xFF)はOWReadByte()と同じ働きをし、OWTouchByte(data)はOWWriteByte(data)と同じ働きをすることに留意してください。
これらの関数およびtickDelayだけで、ビット、バイト、およびブロックレベルでの1-Wireバスの基本制御が可能です。下記の例4に示す例は、これらの関数をともに使用してDS2432のSHA-1認証されたページを読み取る方法を示しています。
例4. DS2432での読み取り例
//-----------------------------------------------------------------------------
// Read and return the page data and SHA-1 message authentication code (MAC)
// from a DS2432.
//
int ReadPageMAC(int page, unsigned char *page_data, unsigned char *mac)
{
        int i;
        unsigned short data_crc16, mac_crc16;

        // set the speed to 'standard'
        SetSpeed(1);

        // select the device
        if (OWTouchReset()) // Reset the 1-Wire bus
                return 0; // Return if no devices found

        OWWriteByte(0xCC); // Send Skip ROM command to select single device

        // read the page
        OWWriteByte(0xA5); // Read Authentication command
        OWWriteByte((page << 5) & 0xFF); // TA1
        OWWriteByte(0); // TA2 (always zero for DS2432)

        // read the page data
        for (i = 0; i < 32; i++)
                page_data[i] = OWReadByte();
        OWWriteByte(0xFF);

        // read the CRC16 of command, address, and data
        data_crc16 = OWReadByte();
        data_crc16 |= (OWReadByte() << 8);

        // delay 2ms for the device MAC computation
        // read the MAC
        for (i = 0; i < 20; i++)
                mac[i] = OWReadByte();

        // read CRC16 of the MAC
        mac_crc16 = OWReadByte();
        mac_crc16 |= (OWReadByte() << 8);

        // check CRC16...
        return 1;
}
その他のソフトウェア
このアプリケーションノートで紹介した1-Wireの基本関数は、高度な1-Wireアプリケーションを構築するための基盤として使用することができます。このアプリケーションノートで紹介していない重要なオペレーションの1つに1-Wireの検索があります。検索とは、バスに接続されている複数の1-Wireスレーブから一意のIDを検出する方法です。アプリケーションノート187 「1-Wire検索アルゴリズム」は、この方法を詳細に説明し、これらの1-Wire基本関数で使用できる「C」コードを示しています。
1-Wire Public Domain Kit (パブリックドメインキット)には、ここで紹介した内容に基づいて構築されたデバイス特有のコードが多数含まれています。
その他のリソースの詳細については、アプリケーションノート155 「1-Wire®ソフトウェアリソースガイドデバイス解説」を参照してください。
代替案
特定の用途においてソフトウェアによる解決策が対応できない場合、1-Wireマスターチップまたは論理合成された1-Wireマスターブロックを代替として使用することができます。
マキシムは、VerilogおよびVHDLで定義済みの1-Wireマスターを提供しています。
DS1WM
1-WireマスターのVerilog/VHDLコードの入手については、テクニカルサポートまでお問い合わせください。
論理合成可能な1-Wireマスターのオペレーションについては、アプリケーションノート119 「FPGAまたはASICへの1-Wire®マスターの組み込み」にて説明しています。
マイクロプロセッサの周辺機器として使用可能な1-Wireマスターチップがいくつかあります。DS2480Bシリアル1-Wireラインドライバを使用すると、標準シリアルポートに容易に接続することができます。同様に、DS2482-100、DS2482-101、およびDS2482-800はI²Cポートに接続可能です。
DS2480Bのオペレーションについては、アプリケーションノート192 「シリアル1-Wire®ラインドライバDS2480Bの使用」にて説明しています。
DS2482のオペレーションについては、アプリケーションノート3684 「DS2482 I²C 1-Wire®マスターの使用方法」にて説明しています。
長距離用に特別設計されたより高度な1-Wireラインドライバは、アプリケーションノート244 「高度1-Wireネットワークドライバ」にて説明しています。
この記事に関して
製品
シングルチャネル1-Wireマスター
1-Wire、デュアルチャネル、アドレス指定可能なスイッチ
シリアルから1-Wireへのラインドライバ
Thermochron iButtonスタータキット
1-WireクワッドA/Dコンバータ
割込み付き、1-Wireタイムチップ
iButton RTC
1-Wire寄生電力デジタルサーモメータ
1-Wireデジタル温度センサー、1Kbロック可能なEEPROM内蔵
1-Wire寄生電力デジタルサーモメータ
寄生電源デジタルサーモメータ
1-Wire寄生電源、周囲温度センサー
プログラマブル分解能1-Wireデジタルサーモメータ
iButton温度ロガー
Thermochron iButtonデバイス
iButton Hygrochron温度/湿度ロガー 、8KBデータログメモリ内蔵
8KBデータログメモリ付き、iButton温度ロガー
8KBデータログメモリ付き、iButton温度ロガー
1-Wire EEPROM
iButton 1Kb/4Kbメモリ
4Kb、1-Wire EEPROM
48ビットノードアドレスチップ
1Kbメモリ付き、デュアル、アドレス指定可能なスイッチ
iButton 1Kb/4Kbメモリ
iButton 1Kbアドオンリー
1Kbアドオンリーメモリ
SHA-1エンジン内蔵、1Kb保護1-Wire EEPROM
PIO付き、4096ビットアドレス指定可能1-Wire EEPROM
シリコン・シリアル・ナンバー、VCC入力内蔵またはなし
iButton 16Kbメモリ
iButton 256ビットEEPROM
16Kbアドオンリーメモリ
iButton金融用デバイス、SHA-1関数内蔵
iButton 4Kb EEPROM
iButton 64Kbメモリ
iButtonシリアルナンバー
1024ビット、1-Wire EEPROM
iButton 16Kbアドオンリー
シリコンシリアルナンバー
1-Wire SHA-1認証用IC
1.8V動作、1-Wire SHA-1認証1Kb EEPROM
スマートバッテリモニタ
警報付き、高精度Li+ (リチウムイオン)バッテリモニタ
8KBデータログメモリ付き、1-Wire温度/データロガー
スリープモード付き、シングルチャネル1-Wire®マスター
8チャネル1-Wireマスター
製品カテゴリ
{{modalTitle}}
{{modalDescription}}
{{dropdownTitle}}
- {{defaultSelectedText}} {{#each projectNames}}
- {{name}} {{/each}} {{#if newProjectText}}
-
 {{newProjectText}}
{{/if}}
{{newProjectText}}
{{/if}}
{{newProjectTitle}}
{{projectNameErrorText}}
最新メディア 21