Measuring the Linearity of Differential-Output, Current-Mode Digital-to-Analog Converters (DACs)
Abstract
Measuring the linearity of digital-to-analog converters (DACs) is not a trivial task. There are many potential sources of error, including thermal effects, ground loops, and instrument accuracy. Additionally, a complete linearity measurement of DACs with digital resolution in excess of 10 bits can be time consuming with bench instruments. This application note details how to perform these tests quickly with minimal errors.
Note: Analog Devices manufactures many current-output DACs with various resolutions. The MAX5891 will be used for specific examples of measurements and specifications in this paper. However, the parameters and techniques can be applied to many other differential-output, current-mode DACs.
Brief Discussion of Linearity Parameters
Two main specifications are used for defining the linear accuracy of data converters: integral (INL) and differential (DNL) nonlinearity. INL is the deviation of the output transfer function from an ideal straight line. DNL refers to the error in the step size at the converter output with respect to an ideal step size.
INL can be specified using one of two techniques: (1) end-point INL or (2) best-fit INL. End-point INL means that the actual values measured at the end points of the DAC transfer curve are used for computing the converter's linearity. Best-fit INL, on the other hand, computes the slope of the transfer curve to minimize the peak reported INL.

Figure 1a. End-point integral linearity error.
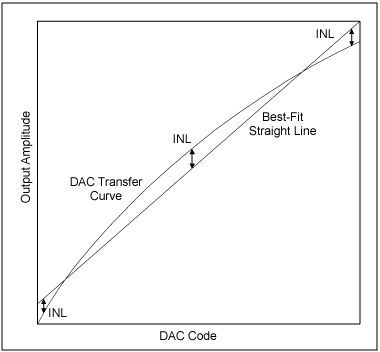
Figure 1b. Best-fit integral linearity error.
Figures 1a and 1b display a graphical representation of how the two methods relate to a given transfer function. Notice that the size and shape of the curve in the DAC transfer function is identical in both cases. Note also that Figure 1a, using end-point linearity, has a large, positive INL with no negative error.
Applying a best-fit method, as shown in Figure 1b, reduces the reported maximum INL by moving some of the positive error to the negative side of the straight line. Notice that the total magnitude of the linearity error remains the same as the straight-line calculation.
The DNL specification is less open to interpretation, though how the weight of the least-significant bit (LSB) is determined can impact the DNL. One concern with DNL in a DAC is that there are no codes with a DNL of less than -1 LSB. DNL errors below this level indicate that the device is nonmonotonic. A DAC is monotonic when the output does not decrease when the input code increases, or when the output does not increase when the input code decreases. Figure 2 illustrates positive and negative DNL errors and clarifies the concept of monotonicity.
The method used for measuring linearity needs to account for the architecture of the DAC being evaluated. Converting the output of a current-mode DAC to a voltage is preferred because it enables the use of a voltmeter rather than a current meter. The typical multimeter has greater resolution when measuring voltages than currents. The configuration of the current sources determines how many codes need to be measured to get an accurate assessment of the device's performance.

Figure 2. Example of DNL errors.
Converting a current (I) to a voltage (V) can be accomplished in many ways but is dependent on several factors. One of the first things to consider is the multimeter that will be used for the measurements. The maximum resolution of the available equipment determines the minimum LSB weight required for an accurate measurement. The recommended ratio for LSB-weight-to-meter-resolution is 100 to 1; the meter should be able to measure 1/100th of an LSB.
The output-compliance rating of the specific DAC under test also impacts how the I-to-V conversion is accomplished. Output compliance for a current-mode DAC is the ability of the device to tolerate a voltage at its output without impacting its performance. Increasing the load resistor increases the voltage swing and the LSB size, but the compliance rating limits the maximum load.
An alternative to a simple resistive conversion is the use an operational amplifier in a virtual-ground configuration, as shown in Figure 3. The advantage of this configuration is the ability to increase the LSB size significantly higher than compliance limitations would otherwise allow since the voltage at the DAC output is held at zero. However, the compliance and linearity of the amplifier, along with thermal gradients, may impact the measurements. Also, two matched amplifiers would be needed to measure a differential-output device.

Figure 3. Virtual-ground I-to-V conversion.
Another consideration when measuring linearity is the resolution of the DAC to be evaluated. Higher resolution devices generate smaller LSB sizes. Consider the MAX5891 (16-bit), the MAX5890 (14-bit), and the MAX5889 (12-bit) devices. Each of these devices output 20mA full scale. The respective LSB sizes would be 15.25µV, 61.04µV, and 244.2µV when using a 50Ω load. The smaller the LSB size, the higher the accuracy and resolution required by the multimeter.
Regarding the DAC's resolution, one should also determine how many codes are required to accurately measure the device's performance. A 16-bit device has 65,536 possible input codes, and a 12-bit device has 4,096. Because it is impractical to measure all of them manually, a common technique is to measure a subset of codes. The smaller number of codes reduces the time required to collect the data and can still provide very accurate results. Knowledge of the device's architecture is useful for selecting an optimal code set for a given device.
Temperature effects can be significant when measuring the linearity of current-output devices. Power dissipated in the output load resistors causes the resistors to heat up, which in turn changes their resistance value (unless resistors are used with 0ppm temperature coefficients). One method to combat this is to switch the input codes in a way that effectively provides averaging for the power dissipated by the loads.
The technique here is best suited for automated measurements since the dwell time at any given code can be minimized. Each code and its complement are measured, such as 0x4800 then 0xB7FF. By measuring each code and its complement, the average power remains constant in the load, since the most-significant bit (MSB) inputs are measured in a ramp fashion from zero scale to full scale. Because LSBs are measured at mid-scale, this technique is not applied to them, since the change in power is relatively small.
Measurement Details
The following is the linearity measurement method that Analog Devices has used in the development of several devices. The MAX5873, MAX5875, MAX5885, MAX5888, MAX5891, MAX5895, and MAX5898 devices have all been measured using this method. Laboratory measurements were made during initial design evaluation and in the verification of production test methods. While the example that follows is specific to the MAX5891, this method can also be applied to other devices.
The MAX5891 device utilizes a 5-4-3-4 segmentation architecture. Segmentation is the effective division of the single 16-bit device into four separate DACs, a 5-bit, a 4-bit, a 3-bit, and a second 4-bit device. The 5 MSBs consist of 31 (25 - 1) equal-weighted current sources, one for each possible input code for the 5 bits. The next 4 bits use 15 sources, and the next 3 use 7. The 4 LSBs are binary-weighted current sources with each lower bit equal to half the previous bit's value.
The total number of current sources, 57 (31 + 15 + 7 + 4) plus full scale and zero scale, determines the minimum number of codes needed to measure the MAX5891's linearity. These 59 measurements allow one to reconstruct the complete DAC output transfer function. Once the transfer function is determined, the linearity can be computed. The downside of this technique can be a reduction in accuracy, a tradeoff for reduced test time. Table 1 lists the code set recommended for the MAX5891.
| Measurement | Code (HEX) |
Measurement | Code (HEX) |
Measurement | Code (HEX) |
| 1 | 0x0000 | 21 | 0x8500 | 41 | 0x7000 |
| 2 | 0x8001 | 22 | 0x8580 | 42 | 0x7800 |
| 3 | 0x8002 | 23 | 0x8600 | 43 | 0x8000 |
| 4 | 0x8004 | 24 | 0x8680 | 44 | 0x8800 |
| 5 | 0x8010 | 25 | 0x8700 | 45 | 0x9000 |
| 6 | 0x8020 | 26 | 0x8780 | 46 | 0x9800 |
| 7 | 0x8030 | 27 | 0x0800 | 47 | 0xA000 |
| 8 | 0x8040 | 28 | 0x1000 | 48 | 0xA800 |
| 9 | 0x8050 | 29 | 0x1800 | 49 | 0xB000 |
| 10 | 0x8060 | 30 | 0x2000 | 50 | 0xB800 |
| 11 | 0x8070 | 31 | 0x2800 | 51 | 0xC000 |
| 12 | 0x8080 | 32 | 0x3000 | 52 | 0xC800 |
| 13 | 0x8100 | 33 | 0x3800 | 53 | 0xD000 |
| 14 | 0x8180 | 34 | 0x3800 | 54 | 0xD800 |
| 15 | 0x8200 | 35 | 0x4000 | 55 | 0xE000 |
| 16 | 0x8280 | 36 | 0x4800 | 56 | 0xE800 |
| 17 | 0x8300 | 37 | 0x5000 | 57 | 0xF000 |
| 18 | 0x8380 | 38 | 0x5800 | 58 | 0xF800 |
| 19 | 0x8400 | 39 | 0x6000 | 59 | 0xFFFF |
| 20 | 0x8480 | 40 | 0x6800 |
The MAX5890 and other Analog Devices 14-bit devices use a 5-4-3-2 segmentation architecture. The code set for the 14-bit architecture is shown in Table 2. The MAX5889 and other Analog Devices 12-bit devices use a 5-4-3 architecture. The code set for the 12-bit architecture is shown in Table 3.
| Measurement | Code (HEX) |
Measurement | Code (HEX) |
Measurement | Code (HEX) |
| 1 | 0x0000 | 29 | 0x2140 | 39 | 0x1C00 |
| 2 | 0x2001 | 21 | 0x2160 | 40 | 0x1E00 |
| 3 | 0x2002 | 22 | 0x2180 | 41 | 0x2000 |
| 4 | 0x2004 | 23 | 0x21A0 | 42 | 0x2200 |
| 5 | 0x2008 | 24 | 0x21C0 | 43 | 0x2400 |
| 6 | 0x200C | 25 | 0x21E0 | 44 | 0x2600 |
| 7 | 0x2010 | 26 | 0x0200 | 45 | 0x2800 |
| 8 | 0x2014 | 27 | 0x0400 | 46 | 0x2A00 |
| 9 | 0x2018 | 28 | 0x0600 | 47 | 0x2C00 |
| 10 | 0x201C | 29 | 0x0800 | 48 | 0x2E00 |
| 11 | 0x2020 | 30 | 0x0A00 | 49 | 0x3000 |
| 12 | 0x2040 | 31 | 0x0C00 | 50 | 0x3200 |
| 13 | 0x2060 | 32 | 0x0E00 | 51 | 0x3400 |
| 14 | 0x2080 | 33 | 0x1000 | 52 | 0x3600 |
| 15 | 0x20A0 | 34 | 0x1200 | 53 | 0x3800 |
| 16 | 0x20C0 | 35 | 0x1400 | 54 | 0x3A00 |
| 17 | 0x20E0 | 36 | 0x1600 | 55 | 0x3C00 |
| 18 | 0x2100 | 37 | 0x1800 | 56 | 0x3E00 |
| 19 | 0x2120 | 38 | 0x1A00 | 57 | 0x3FFF |
| Measurement | Code (HEX) |
Measurement | Code (HEX) |
Measurement | Code (HEX) |
| 1 | 0x000 | 20 | 0x860 | 39 | 0x800 |
| 2 | 0x801 | 21 | 0x868 | 40 | 0x880 |
| 3 | 0x802 | 22 | 0x870 | 41 | 0x900 |
| 4 | 0x803 | 23 | 0x878 | 42 | 0x980 |
| 5 | 0x804 | 24 | 0x080 | 43 | 0xA00 |
| 6 | 0x805 | 25 | 0x100 | 44 | 0xA80 |
| 7 | 0x806 | 26 | 0x180 | 45 | 0xB00 |
| 8 | 0x807 | 27 | 0x200 | 46 | 0xB80 |
| 9 | 0x808 | 28 | 0x280 | 47 | 0xC00 |
| 10 | 0x810 | 29 | 0x300 | 48 | 0xC80 |
| 11 | 0x818 | 30 | 0x380 | 49 | 0xD00 |
| 12 | 0x820 | 31 | 0x400 | 50 | 0xD80 |
| 13 | 0x828 | 32 | 0x480 | 51 | 0xE00 |
| 14 | 0x830 | 33 | 0x500 | 52 | 0xE80 |
| 15 | 0x838 | 34 | 0x580 | 53 | 0xF00 |
| 16 | 0x840 | 35 | 0x600 | 54 | 0xF80 |
| 17 | 0x848 | 36 | 0x680 | 55 | 0xFFF |
| 18 | 0x850 | 37 | 0x700 | ||
| 19 | 0x858 | 38 | 0x780 |
Now that the code set has been defined, we must address how the measurements will be collected. The preferred multimeter for these measurements is the Agilent™ 3458, which provides 8.5 digits of resolution. The meter is connected between the OUTP and OUTN terminals of the MAX5891, which are terminated in 50Ω loads to ground. The resulting voltage swing at the meter input is ±1V when the DAC is set for a 20mA full-scale current.
The meter range is set to a fixed 1.2V full-scale range with maximum resolution, which results in a 10nV minimum measurement. Switching meter ranges can add gain errors to the measured values; therefore, a single voltage range is used to eliminate this additional error source. A clock signal is also required for MAX5891 since the digital inputs are latched. Once the meter, clock source, supply voltage, and digital input controls are connected, we are ready to collect the linearity measurements.
After all the measurement points are collected, we need to create the reconstructed DAC output transfer curve. Since each individual current source was measured, we can easily create a transfer function for all codes. For example, consider the 4 LSBs of the device. We measured codes 0x8000, 0x8001, 0x8002, 0x8004, and 0x8008. Code 0x8000, mid-scale of the DAC is the reference for the LSB calculations. The weight for the LSB is the voltage measured at 0x8001 minus the voltage measured at 0x8000.
Similar equations apply for all the codes measured between 0x8001 and 0x8780. The remaining points, 0x0800 through 0xF800, are the MSB current sources, and they are computed with reference to code 0x0000. Consider the code 0x4F31 as an example of how the various currents are summed.
First, we need to determine which measurement points, when added together, will equal the example code. 0x4800 is the highest MSB code that is less than the target code. The remainder when subtracting 0x4800 from 0x4F31 is 0x0331. Code 0x0300 is the next highest code that can be subtracted (0x8300 - 0x8000), followed by 0x0030 (0x8030 - 0x8000), and finally 0x0001 (0x8001 - 0x8000).
Therefore, the voltage for code 0x4F31 can be expressed by the equation:
[V(0x4800) - V(0x0000)] + [V(0x8300) - V(0x8000)] + [V(0x8030) - V(0x8000)] + [V(0x8001) - V(0x8000)]
Using similar equations, we can compute the voltage for any given input code. Tools such as MATLAB® or Excel® software can be used to easily compute the voltage for all codes and reconstruct the entire DAC transfer curve.
Once we have the transfer curve, we can compute the linearity. The first step is to calculate the voltage for an LSB based on the end points of the transfer curve (end-point method).
VLSB = [V(0xFFFF) - V(0x0000)]/[2N - 1]
where
N is the device resolution (16, 14, or 12 bits)
V(0x0000) is the measured DAC zero-scale output voltage
V(0xFFFF) is the measured DAC full-scale output voltage
The INL for any given code is then calculated with the equation:
INLCODE(LSBs) = [VCODE - (CODE × VLSB)]/VLSB
where
CODE is the digital code being calculated
VLSB is the voltage calculated in Eq. 2
VCODE is the computed DAC output voltage
The following is the equation for calculating the DNL for any given code:
DNLCODE(LSBs) = [VCODE - VCODE-1 - VLSB]/VLSB
where
CODE is the digital code being calculated
VCODE is the calculated DAC output voltage for CODE
VCODE-1 is the calculated DAC output voltage for CODE - 1
VLSB is the voltage calculated in Eq. 2
Below are example MATLAB scripts that calculate the linearity of the MAX5889, MAX5890, and MAX5891. Each returns the codes and values for the minimum and maximum DNL and INL errors. They also generate plots showing the transfer curve, INL, and DNL for all possible codes. The user is required to enter the voltage measurements for the codes listed in the previous tables. The values must be entered in the order they are listed.
MATLAB Script to Compute 16-Bit Linearity
function Lin16(Measurements)
%Calculate INL and DNL of a 16-bit device with a 5-4-3-4 segmentation architecture

% DacCodes is the range of possible input data to the 16-bit DAC
DacCodes=[0:65535]';

%VOUT for each code is calculated from the measured points
%create a VOUT variable and fill it with zeros
VOUT=zeros(size(DacCodes));

%The first measurement is the zero-scale point, or code (0x0000)
ZS=Measurements(1);
VOUT(1)=ZS;

%The last measurement is the full-scale point, or code (0xFFFF)
FS=Measurements(length(Measurements));
VOUT(65536)=FS;

%Midscale is stored at position 43 of the input data array
MS=Measurements(43);

%The device has four segmentation levels
Segments=4;

%The decimal values for the LSB codes are 1, 2, 4 and 8
Seg1Codes=[1;2;4;8];

%The voltages for the LSBs are in positions 2–5 of the input array
for i=1:4
    Seg1V(i)=Measurements(i+1)-MS;
end

%The second level of segmentation is controlled with input codes 16 through
%112 in steps of 16. Create the code array and fill the measurements for
%this segmentation level
Seg2Codes=[16:16:16*7]';
for i=1:7
    Seg2V(i)=Measurements(i+5)-MS;
end

%Segmentation level 3 uses input codes 128 through 1920 in steps of 128.
%Create the code array and fill the measurements array.
Seg3Codes=[128:128:128*(2^4-1)]';
for i=1:15
    Seg3V(i)=Measurements(i+12)-MS;
end

%Segmentation level 3 uses input codes 2048 through 63,488 in steps of 2048.
%Create the code array and fill the measurements array.
Seg4Codes=[2048:2048:2048*(2^5-1)]';
for i=1:31
    Seg4V(i)=Measurements(i+27)-ZS;
end

%The endpoints have been defined, now fill in the voltages for the
%remaining points of the DAC transfer function.
for i = 2:65535
    targetcode=i-1;
    VOUT(i)=ZS;
    for s=31:-1:1
       if Seg4Codes(s)<=targetcode
            targetcode=targetcode-Seg4Codes(s);
            VOUT(i)=VOUT(i)+Seg4V(s);
            s=0;
       end
    end
    for s=15:-1:1
       if Seg3Codes(s)<=targetcode
            targetcode=targetcode-Seg3Codes(s);
            VOUT(i)=VOUT(i)+Seg3V(s);
            s=0;
       end
       if targetcode==0
            s=0;
       end
    end
    for s=7:-1:1
       if Seg2Codes(s)<=targetcode
            targetcode=targetcode-Seg2Codes(s);
            VOUT(i)=VOUT(i)+Seg2V(s);
            s=0;
        end
       if targetcode==0
             s=0;
       end
    end
    if targetcode==0
            s=0;
    end
    for s=4:-1:1
       if Seg1Codes(s)<=targetcode
           targetcode=targetcode-Seg1Codes(s);
           VOUT(i)=VOUT(i)+Seg1V(s);
       end
    end
end

%Plot the transfer function
figure(1)
plot(DacCodes, VOUT);
xlabel('DAC Input Code');
ylabel('Measured Voltage');
axis([0 65536 -1.1 1.1]);
title('DAC Transfer Function');
set(gca,'XTick',0:16384:65536)

%Calculate the linearity
LSB=(max(VOUT)-min(VOUT))/65535;
INL(1)=0;
DNL(1)=0;
for i=2:65536
    INL(i)=(VOUT(i)-(VOUT(1)+(i-1)*LSB))/LSB;
    DNL(i)=(VOUT(i)-VOUT(i-1)-LSB)/LSB;
end

%Plot INL
figure(2)
plot(DacCodes, INL);
title('DAC Integral Linearity');
xlabel('DAC Input Code');
ylabel('INL (LSBs)');
axis([0 65536 min(INL)*1.1 max(INL)*1.1]);
set(gca,'XTick',0:16384:65536)

%Plot DNL
figure(3)
plot(DacCodes, DNL);
title('DAC Differential Linearity');
xlabel('DAC Input Code');
ylabel('DNL (LSBs)');
axis([0 65536 min(DNL)*1.1 max(DNL)*1.1]);
set(gca,'XTick',0:16384:65536)
txtstr=sprintf('INL MAX = %f', max(INL));
disp (txtstr);
txtstr=sprintf('INL MIN = %f', min(INL));
disp (txtstr);
txtstr=sprintf('DNL MAX = %f', max(DNL));
disp (txtstr);
txtstr=sprintf('DNL MIN = %f', min(DNL));
disp (txtstr);
Example Plots Generated by the 16-Bit Script


{{modalTitle}}
{{modalDescription}}
{{dropdownTitle}}
- {{defaultSelectedText}} {{#each projectNames}}
- {{name}} {{/each}} {{#if newProjectText}}
-
 {{newProjectText}}
{{/if}}
{{newProjectText}}
{{/if}}
{{newProjectTitle}}
{{projectNameErrorText}}
Latest Media 21