要約
This tutorial provides instructions on how to build a portable stereo from a vintage suitcase.
Stereo Project
Portable, loud, and fashionable. Take a vintage suitcase and install a set of speakers, passive crossovers, an amplifier, and a couple of rechargeable batteries. Now you have a portable, albeit heavy, stereo that will make your ears bleed.
Inspiration
I got the idea for the stereo from a handful of Internet vendors that make custom, build-to-order jamboxes. They sell them for stupefying amounts of money, often for $800 or more (U.S.). In some extreme cases, the product costs over $2,000. I liked the idea and the sense of profit! I also had the know-how, so I decided to build one for half the cost.
Construction
The Critical Case
It was clear from the outset that the look of the suitcase was almost as important as how it sounded. After striking out at several thrift shops, I found that the best place to shop for vintage and unusual suitcases was online. I purchased a striped tweed suitcase from the 1940s that was to my liking and reasonably priced.
The Electronics
As an applications engineer, I have access to the full catalog of Maxim Integrated parts and evaluation (EV) kits. I picked the highest wattage Class D amp, the MAX98400A. This part was appealing because it could be configured to work as a stereo amp with 20W per channel, or with minimal tweaking, it could be configured to work as a mono 40W amp. I really liked that the MAX98400AEVKIT (Figure 1) had two amps on it with shared power rails.
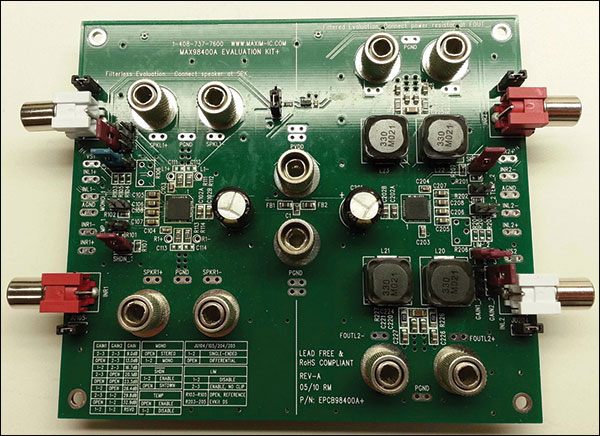
Figure 1. The MAX98400A started the whole project. The EV kit board has two 40W amps on it, and I was ready to build something that could be loud.
This EV kit demonstrates that filtering the output of a Class D amplifier is not necessary because the speaker that it drives acts as a filter. Of the two amps on the EV kit, one is specified for filterless evaluation and the other has an on-board, passive Class D filter. At first I thought that I would build a 2.1 system with one amp outputting stereo and one amp driving all of its power into a single woofer. After careful consideration, I decided to go with a bi-amped design to drive eight speakers. One stereo amp powers the two woofers. The other stereo amp goes to a crossover and then to a midrange driver with two tweeters per channel (Figure 2).
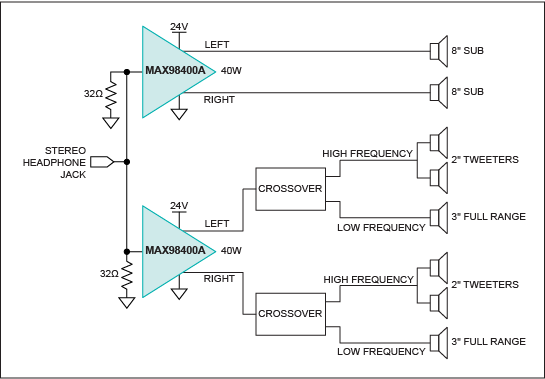
Figure 2. Schematic of the speaker elements using the two MAX98400A amps. One amp is dedicated to powering the big 8in drivers; the other amp goes through a crossover to power two 2in tweeters and a 3in full-range speaker.
The Audio Setup
Having rebuilt home audio speakers before, I selected drivers based on two design considerations: size/geometry and look. I made paper templates to ensure that the speakers would fit in my desired layout. Once the speakers were installed, I noticed that the walls of the suitcase could not support the weight of all the drivers. I then cut out some of the lining and glued in plywood to improve the rigidity and support for the speakers. Next, I selected the passive crossover that made sense with the speakers’ frequency response.
I originally planned to lowpass filter the woofers as well, but listening tests indicated that filtering for the woofers was not really needed. I later confirmed this decision due to the loudness of the unfiltered design. While a filtered scheme would have produced more balanced audio, my stereo suitcase was not really targeting a "balanced" sound. I wanted loudness!
During assembly, I used 12-gauge speaker wire and banana jacks to connect the speakers and crossovers to the EV kit. Then I glued the crossovers to the suitcase walls (Figure 3). I soldered wires to the pins of the headphone jack connector, heat shrunk the solder joints, and did the same to the terminals of my gigantic power switch. Don't skimp on build quality!
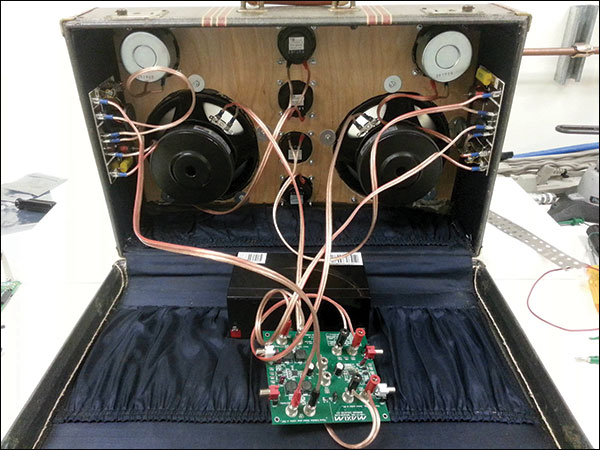
Figure 3. I used 12-gauge speaker wire (overkill, I know) and banana jacks to connect the speakers to the board. I also glued the crossovers to the suitcase walls.
The Power System
Each amp has an absolute maximum supply voltage of 28V, with 24V within the operating range. I picked two UPS, lead-acid batteries for their high-energy density. Yes, they are heavy, but they are contained in a suitcase built to carry a modest load—weight is not a problem. With this much power, the stereo will run at maximum volume for about five hours and much longer at more reasonable volumes.
The battery holster is made from plywood and pipe strap (Figure 4A). To manage the weight distribution, I placed the holster at the bottom and back of the case to counter balance the weight of the speakers. I cut out some suitcase lining to glue in the battery holster (Figure 4B). I also used an XLR port on the side to connect to a 24V battery charger and an on/off switch with an indicator LED. Finally, I stuffed the case with polyfill, which helps deepen the bass and reduce rattling (Figure 5).
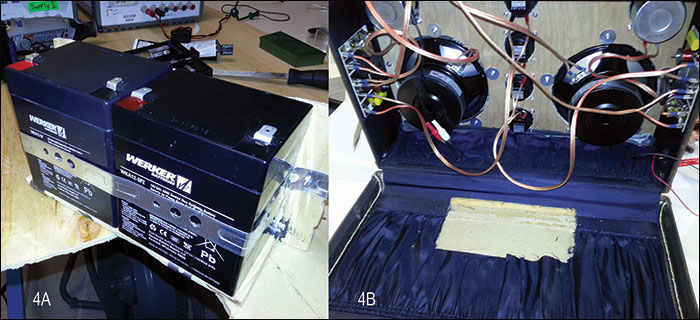
Figure 4. Batteries in the holster (4A). Some of the suitcase lining was removed to accommodate the battery holster, which was placed in the bottom and back of the case to counterbalance the weight of the speakers (4B).
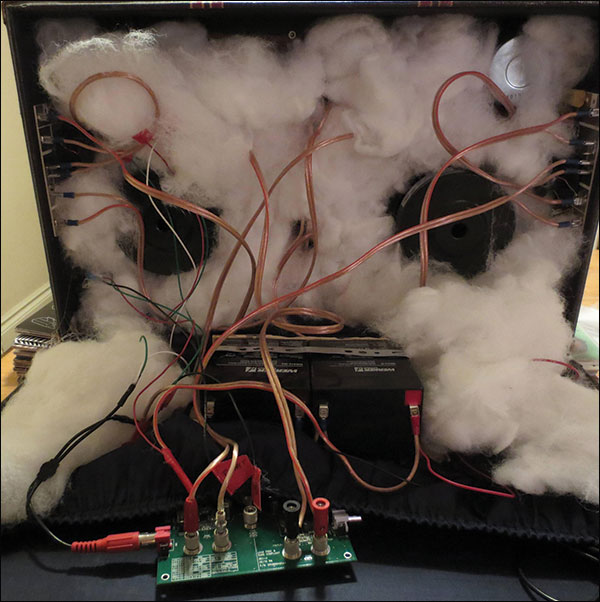
Figure 5. Stuffing the case with polyfill helps deepen the bass and reduce rattling.
Enjoying the Sound
From the beginning, I decided that the audio source from this stereo would be a 3.5mm jack. This way I could play music from smartphones and other portable devices. Then I ran into an interesting problem when using my phone, which uses a jack-detect circuit. The first time I plugged my phone into the jack, it was barely audible. I added a 32Ω resistor to ground at the amplifier’s input to the amplifier (Figure 2) to trick the jack detection circuit. Now when the smart phone checks the impedance during its jack detection, it thinks that it is powering headphones and puts out a greater signal level.
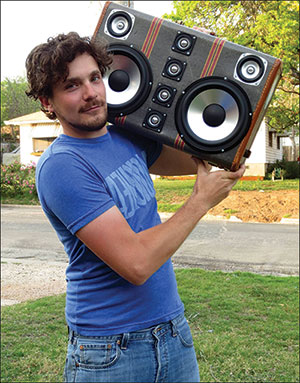
The stereo is loud and was really fun to build. And it sounds as good as it looks (Figure 6). But, I am not done. I want to try to create a better seal between the suitcase and the lid. Currently, if you play “bassy” music at loud volumes, you can hear what sounds like port noise. For now, the plan is to use something like thin foam strips, similar to weather stripping, where the two parts of the case meet. I also plan to add Bluetooth® connectivity. The stereo already has style for miles, but ditching the headphone wire would really put it over the top.
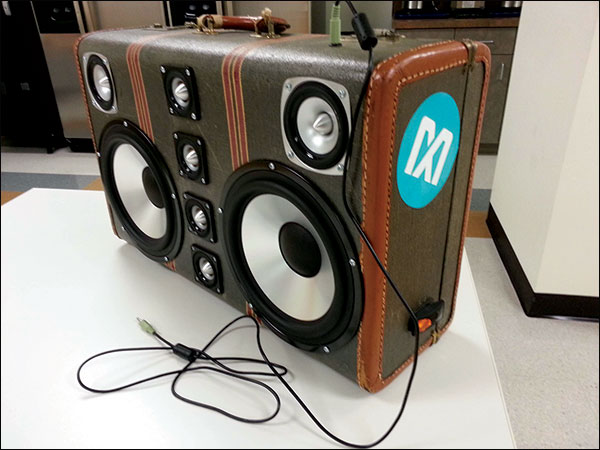
Figure 6. The completed stereo suitcase.
| Item | Qty | Description |
| MAX98400AEVKIT | 1 | Evaluation kit with board for the MAX98400A Class D amplifier |
| WKA12-5F2 | 2 | 12V UPS batteries, Werker |
| 260-198 | 2 | Two-way, 8Ω 5kHz, 150W crossover, Partsexpress.com |
| 264-809 | 2 | 3in full-range driver, Tang Band |
| 264-805 | 4 | 2in tweeters, Tang Band |
| 295-332 | 2 | 8in aluminum cone woofer, Dayton Audio |
| 2404SX | 1 | 24V, 2A battery charger, Soneil |
| F3FSTF | 1 | Female XLR connector, Switchcraft |
| GRB292A201BBNA2 | 1 | Rocker switch, CW Industries |
| 30-711 | 1 | 0.5mm female jack receptacle, Markertek.com |
| Builder’s choice | 1 | “Sweet-looking case” |
この記事に関して
{{modalTitle}}
{{modalDescription}}
{{dropdownTitle}}
- {{defaultSelectedText}} {{#each projectNames}}
- {{name}} {{/each}} {{#if newProjectText}}
-
 {{newProjectText}}
{{/if}}
{{newProjectText}}
{{/if}}
{{newProjectTitle}}
{{projectNameErrorText}}
最新メディア 20