Choosing the Right Transformer with the MAX13256
要約
The MAX13256, a 10 Watt transformer driver, is an improved way to convey power across isolation boundaries. As with all transformer drivers, good system performance requires good transformer specification. Though many transformers can potentially work with the MAX13256, not all transformer data sheets are specified with a transformer driver application in mind. This application note discusses how to specify a transformer that meets your application needs.
Introduction
The MAX13256 is a small, high-performance transformer driver, ideal for isolated power delivery in industrial or medical environments. The MAX13256 is an unregulated DC-DC circuit component, that is, it has no feedback to control the secondary voltage. For this reason, the MAX13256 can be particularly attractive in applications where the secondary power does not need tight regulation. Even when good regulation is requested, following a MAX13256 with a post regulator can still be a cost competitive solution.
So how do you set output voltages? Unlike regulated DC-to-DC architectures, the MAX13256 always drives the transformer with a 50% duty cycle square wave. Consequently, output voltages depend on transformer winding turns ratios. So, care must be taken to select or specify an appropriate transformer for each application.
Finding a suitable transformer can be as simple as choosing an existing product specific for the MAX13256, or searching catalogs of general-purpose transformers for a suitable product. Also, transformer suppliers will manufacture custom designs, sometimes with little or no nonrecurring engineering (NRE), and fast turn-around, so if one of the standard offerings does not meet your needs, you can specify your own. Many transformer vendors accept high level specifications. For those vendors needing some help, you will also learn how to provide them with a basic design.
Important Parameters Affected by Transformer Specifications
After checking that a transformer meets your all-important isolation needs, other factors come into play. Transformer specifications affect:
- Power dissipation in the MAX13256: affected by core losses and magnetizing inductance
- Power dissipation in the transformer: affected by core losses, primary resistance, magnetizing inductance, and secondary resistance
- Output voltage: affected by primary resistance and secondary resistance
- Peak output current: affected by core losses and magnetizing inductance
Choosing an Existing Product Specifically for the MAX13256
Often, an existing product is close enough to meet the needs of the application. This is a great way to go, because many factors are already taken into account for you. The transformer is known to provide the rated current at the rated temperature range.
If the transformer data sheet specifies MAX13256 compatibility, then inspect the data sheet to ensure that the following meet your needs:
- Isolation level
- Temperature range
- Output load current
Then, use the “MAX13256 Specific Transformer” spreadsheet for further verification. Though it may be tempting to do so, avoid surpassing the specifications. For example, exceeding the output current specification may lead to overheating of the transformer or the MAX13256.
With transformer driver circuits, it is important always to prototype on the bench and verify operation with various loads and over temperature. It is impractical to include all factors in an analysis. Consider analysis as a means to create an initial design and expect to slightly modify the design based on bench verification.
Using the “MAX13256 Specific Transformer” Spreadsheet
Transformers designed specifically to work well with the MAX13256 will provide a temperature range, an isolation level, an ET product (sometimes called ET constant), a maximum secondary (output) current, and primary and secondary resistances. Usually absent are core loss and magnetizing inductance.
With these parameters, a good design can be created. The important design parameters can be verified. However, if total power dissipation or efficiency is needed, these must be obtained from bench measurements conducted on prototypes. Verification amounts to ensuring that the ET product is not violated, and that the output voltage is sufficient for the intended application.
For example, let’s say you have a 26V source, and need to derive an isolated 5V supply from it. The circuit operates in the commercial temperature range, needs 5kV isolation, and must provide a load of 0.5A.
A search brings up a possible attractive candidate, the TGMR-502V6LF1. The isolation is adequate, and the temperature range and output load capability of the transformer exceeds requirements. Let’s verify other parameters using the spreadsheet. Figure 1 shows what to enter in the first section, “From the MAX13256 Data Sheet”:

Figure 1. Data entry for MAX13256 specific transformer example, MAX13256 section.
Spreadsheet cell C3 is the sum of the on-resistance of the bridge switches inside the MAX13256, that is, the sum of the data sheet specifications ROH and ROL. The typical value is 1.6?. For a worst-case analysis, change cell C3 to 2.5?. Spreadsheet cell C4 is the minimum switching frequency, in Kilo-Hertz. If using the internal oscillator for clocking, this value is 510kHz. In the case of external clocking, enter the lowest frequency going into the CLK pin here.
Next, enter parameters into the second section, “From the Transformer Data Sheet” as shown in Figure 2.
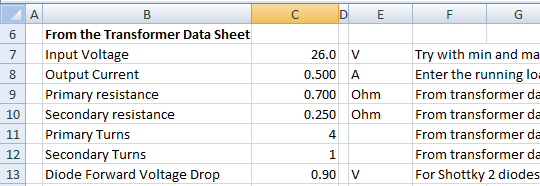
Figure 2. Data entry for MAX13256 specific transformer example, transformer section.
Enter the voltage driving the MAX13256 VDD pin in spreadsheet cell C7. For this example, it is 26V. Enter the output load current in cell C8. According to this example, it is 0.5A. The transformer specification is used to enter the corresponding data in cells C9 through C12.

Figure 3. MAX13256 secondary rectifier topologies.
Two common secondary rectifier topologies are shown in Figure 3. Enter double the primary turns in cell C11 if the secondary rectifier topology is push-pull. For example, if the TGMR-512V6LF is used instead, with a push-pull rectifier, enter “8” in cell C11 and “1” in cell C12.
This topology also affects what is entered in cell C13. For full-wave rectifiers, the output voltage reduces by two diode drops, whereas for push-pull rectifiers, only by one diode drop. Consult the diode data sheet to determine the expected forward bias drop per diode. If no diode has yet been chosen, enter a suggested default value from Table 1, and then later substitute for a close value once a specific diode has been selected.
| Rectifier Topology | Diode technology | |
| Schottky | Silicon | |
| Push-Pull | 0.45V | 0.7V |
| Full-Wave | 0.7V | 1.4V |
Finally, consult the fourth section of the spreadsheet, “Calculated Results”. Cell C23 calculates the minimum allowable ET constant for this application. The transformer specification must equal or exceed this. The Halo TGMR-502V6LF transformer ET constant of 60V-µs, exceeds the required minimum calculated in cell C23.
Spreadsheet cell C24 calculates that the output of the rectifier to be about 5.4V. If the isolated 5V supply needs to be well regulated, regulate this output with an LDO whose dropout voltage is 0.4V or less.
Because not all factors are considered, when performing a worst-case analysis, reduce the output voltage by between 1% and 5%. Also note that, for very light loads, the output voltage may end up much higher than calculated. This can be seen, for example, in the bottom right graph on page 5 of the MAX13256 data sheet.
If light load output voltage is an issue, prototype on the bench at the expected minimum load and measure the output voltage. In some situations, shunting the output with a pre-load resistor reduces the output voltage at light loads.

Figure 4. Calculated results for MAX13256 specific transformer example.
Choosing a Transformer not Designed Specifically for the MAX13256
What if you do not find a standard transformer specifically designed for use with the MAX13256? Then expand your search to look at standard transformer offerings not specifically mentioning the MAX13256. Scanning just a few parameters can quickly shorten an otherwise long list of possible candidates.
First, remove from consideration any transformers not meeting your isolation requirements. Next, look at the turns ratio and ET product. How you look at this depends on the availability of any center taps. For example, if the primary has a center tap, one may choose either to drive the entire winding, or only half the winding. A transformer with one side center tapped provides two possibilities, and one with both primary and secondary center tapped provides four possibilities.
From Table 2, for all the possibilities that apply, keep only the ones that meet both the criteria in the third column and in the fourth column. When consulting Table 2, the ET product is calculated as:
ET = (1000 × VIN)/fSW
where:
- ET is the calculated product (in units of Volt-microseconds), based on circuit requirements
- VIN is the input voltage, in volts
- fSW is the minimum input clock frequency, in kHz, or 510kHz if using the internal oscillator
In Table 2, the tentative turns ratio (TR) is defined as the desired output voltage divided by the input voltage.
| Use Primary Center Tap? | Use Secondary Center Tap? | Calculated ET Product Must be at Most | This Ratio Must Exceed the Tentative Turns Ratio |
| No | No | Transformer ET | Full Secondary Turns/Full Primary Turns |
| No | Yes | Transformer ET | End-to-Center-Tap Secondary Turns/Full Primary Turns |
| Yes | No | Half of Transformer ET | Full Secondary Turns/End-to-Center-Tap Primary Turns |
| Yes | Yes | Half of Transformer ET | End-to-Center-Tap Secondary Turns/End-to-Center-Tap Primary Turns |
Finally, verify suitability for the application with the aid of the “MAX13256 General-Purpose Transformer” spreadsheet.
Using the “MAX13256 General-Purpose Transformer” Spreadsheet
Besides the specifications already mentioned, many transformer data sheets also include the magnetizing inductance, sometimes called the primary inductance. This is sometimes also called the OCL, or open-circuit inductance, because it is measured at a winding with all other windings left open circuit.
The OCL is an important specification to have. Unlike previous transformer driver offerings from Maxim, the MAX13256 limits peak primary current, which protects against overload and short-circuit conditions. The primary inductance causes the primary current to have the classical “ramp on a pedestal” shape, shown in Figure 5.
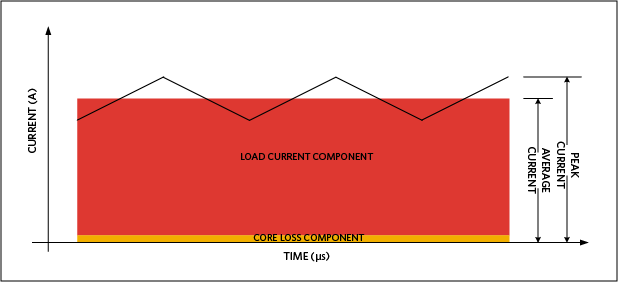
Figure 5. Current waveform at the primary.
At constant load, the transformer sees an average current, consisting of a component providing power to heat the transformer core, and a component to convey power to the load. The primary inductance causes a current ramp to appear on top of this average current. Analysis must include calculations checking that the peak current does not falsely trigger the MAX13256’s protection circuit.
Let’s go through another example. Let’s say you have a 12V rail, and need to create an isolated 12V, 200mA rail, with 1kV isolation. A search brings up a possible candidate, the Coilcraft Q4470-CL2. Let’s verify other parameters using the “MAX13256 General-Purpose Transformer” spreadsheet. Figure 6 shows what to enter in the first section.

Figure 6. Data entry for MAX13256 general-purpose transformer example, MAX13256 section.
Spreadsheet cell C3 is the sum of the on-resistance of the bridge switches inside the MAX13256, that is, the sum of the data sheet specifications ROH and ROL. The typical value is 1.6Ω. For a worst-case analysis, change cell C3 to 2.5Ω. Spreadsheet cell C4 is the minimum switching frequency, in Kilo-Hertz. If using the internal oscillator for clocking, this value is 510kHz. In the case of external clocking, enter the lowest frequency going into the CLK pin here.
To guard against overload and short-circuit faults, the MAX13256 limits peak current supplied to the transformer primary. A resistor on the ITH programs this current-limit threshold. Unless the input current needs to be more restricted, the resistor on the ITH pin should be 1kΩ, for a guaranteed 500mA peak current limit. If the ITH resistor is set to a value higher than 1kΩ, then enter the programmed current limit into cell C5. Otherwise, use the default of 0.5A.
Next, enter parameters into the second section, “Entered by Customer” as shown in Figure 7.
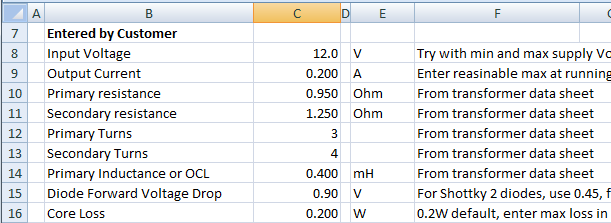
Figure 7. Calculated results for MAX13256 general-purpose transformer example.
Enter the voltage driving the MAX13256 VDD pin in spreadsheet cell C8. For this example, it is 12V. Enter the output load current in cell C9. According to this example, it is 0.2A. Obtain the values for cells C10 through C14 from the transformer data sheet. Even though the transformer has both primary and secondary center taps, this design does not take advantage of them. If the primary center tap were used, the primary turns entry in cell C12 would have been halved, or 1.5. Likewise, if the secondary center tap had been used in the design, the value in cell C13 would be halved, or 2.
The rectifier topology affects what is entered in cell C15. For full-wave rectifiers, the output voltage reduces by two diode drops, whereas for push-pull rectifiers, only by one diode drop. Consult the diode data sheet to determine the expected forward bias drop per diode. If no diode has yet been chosen, enter a suggested default value from Table 1 and then later substitute for a close value once a specific diode has been selected.
Next, consult the fourth section of the spreadsheet, “Calculated Results” in Figure 8.
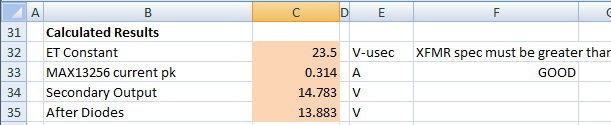
Figure 8. Data entry for MAX13256 general-purpose transformer example, entered by customer section.
Cell C32 calculates the minimum allowable ET product for this application. The transformer ET product of 32V-µs exceeds the minimum required 23.5 in cell C32. If the MAX13256 driver had instead been connected to one end and the center tap of the primary, the transformer would be capable of handling half the stated spec, or 16V-µs. This would be insufficient, so this transformer could not be used center-tapped in this application.
Cell C33 calculates the peak current seen by the MAX13256. This must be below the value entered in cell C5. Note that cell F33 indicates “GOOD”. Should the calculation in cell C33 prove to be too high, cell F33 indicates “PK CURRENT TOO HIGH”.
Spreadsheet cell C35 calculates the expected output voltage of the circuit, in this case, about 13.9V. If a well regulated 12V output is desired, there is enough dropout margin for an LDO.
See Figure 9 for “Power Dissipated” information.
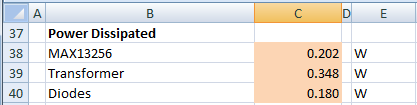
Figure 9. MAX13256 general-purpose transformer example, power dissipated section.
These power dissipation figures are reasonable, and should cause little or no trouble in a well-made design. Note that the transformer power dissipation figure includes the unknown core loss, which is estimated to be 200mW, the value in cell C16. The types of transformers used with the MAX13256, from reputable vendors, tend to have core losses well below the 200mW approximation. This is one more reason why it is important to check circuit performance on the bench.
Specifying a Transformer for a Sophisticated Transformer Vendor
If you do not find a suitable standard product, then you should consider approaching a transformer vendor for a custom product.
Probably the best way to work with a reputable transformer vendor is to work with them during the design phase. Use the “MAX13256 General-Purpose Transformer” spreadsheet to develop a tentative specification for the transformer.
The “hard” specifications you should provide to the transformer vendor are:
- Isolation level
- ET constant
- Output current
- Turns ratio
Estimate the “soft” specifications, and expect the transformer vendor to suggest some changes to these:
- Adjust the primary inductance in cell C14 until the ratio of cell C20 to C9 is below 0.3. This represents the minimum primary inductance the transformer should have. This tends to be the least difficult soft specification to meet
- Estimate 0.2W for the core loss. The transformer vendor adjusts this choosing different ferrites and different cores. The transformer vendor’s experience with ferrites and cores is likely the most valuable thing for you.
- Adjust the primary and secondary resistance, roughly in proportion to the turns ratio, until the transformer dissipation in cell C39 is under 0.75W, and the MAX13256 dissipation in cell C38 is under 1.0W. These figures are a bit conservative because transformer vendors often try to get as close to whatever you provide for these as they can.
Provide these specifications to the transformer vendor for their review, and then adjust according to their feedback. Besides helping you with your design, the transformer vendor also provides value in the quality of the manufacture and testing of the product. This can be especially valuable, for example, when you need high isolation levels, beyond 2.5kV.
Designing a Transformer Using the “XFMR Design MAX13256” Spreadsheet
If you prefer to have more control over your circuit, you can create a preliminary transformer design for review by the transformer vendor. Specify the ferrite and the core used, as well as the wire gauge and the number of turns for each winding. Even if you only plan to specify a transformer, creating a preliminary design can provide insight into the tradeoffs that the transformer vendor will need to make.
For example, let’s design a transformer for the MAX13256 that provides 9V at 0.7A and 5V at 0.4A from a 24V supply. This transformer will have one primary and two secondaries.
The first step is to select a ferrite material. Because most designs use the MAX13256’s internal oscillator, the selected material should work well between 255kHz and 700kHz. Try for a ferrite with a relative permeability over 1000 and a flux density greater than 0.25 Tesla. See Figure 10.
Let’s try the N49 ferrite material3, and use the data sheet to fill in the ferrite section of the spreadsheet.

Figure 10. Ferrite data sheet section of the MAX13256 transformer design spreadsheet.
The peak flux density on the ferrite data sheet, page 2, symbol BS, at 100°C, is 400mT, entered in cell C2. Cell C3 calculates a derated maximum flux. Use the derated flux density as a guide to help set an actual flux density. Inspecting the “relative core losses versus frequency” graph at the bottom left of page 5 of the ferrite data sheet, the 200mT curves stop at 200kHz. To use this material at frequencies above 300kHz, the flux density should be limited to 100mT or below. Various flux densities can be tried. Higher flux densities reduce wire losses, whereas lower flux densities reduce core losses.
For this example, choose 75mT, entered in cell C4. From this same chart, at 500kHz, core loss is about 700 kW/m^3 at 100mT, and about 100 kW/m^3 at 50mT. The geometric mean is about 265, so enter a core loss of 350kW/m^3 into cell C5, the excess being to account for possible operation above 500kHz.
The second step is to choose a core, in this case, a Ferroxcube® EP134. Whereas the ferrite is the material used, the core is the physical shape. From this data sheet, enter the values in the core section of the spreadsheet, as shown in Figure 11.

Figure 11. Core data sheet section of the MAX13256 transformer design spreadsheet.
The parameters specific to the core can be found at the top left of page 693 of the core data sheet. These are the cross-sectional area, the effective length, and the effective volume of the core. The window area is the space allowed for winding the wires. For this EP13 core data sheet, it must be calculated from figure 1 on page 693 of the data sheet. The window area is one of the non-hatched areas in the bottom illustration of figure 1 on page 693 of the core data sheet.
The MLT, or Mean Length per Turn can be found on page 696. The wires are not wound directly on the core, but instead on a coil former, which determines parameters related specifically to winding.
Next, enter the desired voltages and currents into the spreadsheet as shown in Figure 12.
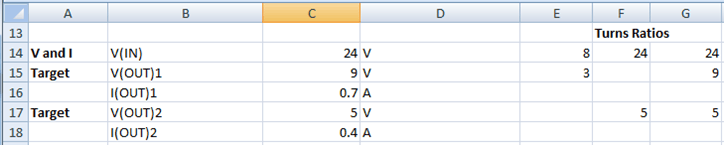
Figure 12. V and I section of the MAX13256 transformer design spreadsheet.
These are taken from the design requirements for the power circuit. See Figure 13.

Figure 13. Switching frequency and peak current input to the MAX13256 transformer design spreadsheet.
Spreadsheet cell C22 is the sum of the on-resistance of the bridge switches inside the MAX13256, that is, the sum of the data sheet specifications ROH and ROL. The typical value is 1.6Ω. For a worst-case analysis, change cell C22 to 2.5Ω. Spreadsheet cell C20 is the minimum switching frequency, in Kilo-Hertz. If using the internal oscillator for clocking, this value is 510kHz. In the case of external clocking, enter the lowest frequency going into the CLK pin here.
To guard against overload and short-circuit faults, the MAX13256 limits peak current supplied to the transformer primary. A resistor on the ITH programs this current-limit threshold. Unless the input current needs to be more restricted, the resistor on the ITH pin should be 1kΩ, for a guaranteed 500mA peak current limit. If the ITH resistor is set to a value higher than 1kΩ, then enter the programmed current limit into cell C23. Otherwise, use the default of 0.5A.
With the preliminaries now out of the way, it is time to select the wire and the number of turns. This is an iterative process. Adjust the number of turns and the wire sizes until finding a transformer design that works. Adding turns reduces peak flux in the core, reducing core losses. However, adding turns also forces the use of smaller wire sizes to fit in the space provided, which increases resistance and winding losses.
The process begins with the “User Turns” section of the “MAX13256 Transformer Design” spreadsheet as seen in Figure 14.
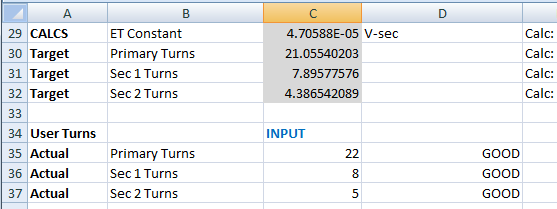
Figure 14. User turns section of the MAX13256 transformer design spreadsheet.
Note the values in cells C30, C31, and C32. These are the minimum turns needed. We start by entering these values into cells C35, C36, and C37, respectively, as seen in Figure 14. Cells D35, D36, and D37 should always indicate “GOOD”. If one or more of these cells displays “NOT ENOUGH TURNS”, then you must increase the corresponding number of turns.
We continue, looking at the “User Wire” section of the spreadsheet.
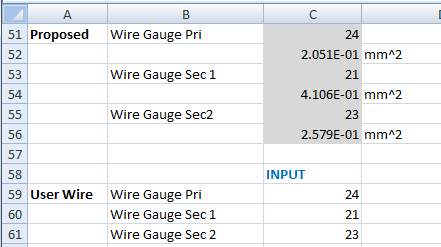
Figure 15. User wire section of the MAX13256 transformer design spreadsheet.
Based on the number of turns and the allowable area for windings, the spreadsheet proposes wire gauges in cells C51, C53, and C55. The user may adjust these. For now, just copy them into cells C59, C60, and C61, as shown in Figure 15. If cell D66 indicates “OVERSTUFFED”, then the entries in cells C59, C60, and C61 must be adjusted upwards until “GOOD” is indicated.
Another warning indicator to look out for is cell D86, which indicates “PK CURRENT TOO HIGH” if the design could trip the MAX13256 overload protection circuit during normal operation. This is either because there are insufficient primary turns, or because you are trying to convert more power than the MAX13256 is capable of. Because of the MAX13256 0.5A peak current limit, delivered power must always be less than half the supply voltage. For example, with a 24V supply, the MAX13256 can never supply as much as 12W of power. See Figure 16.
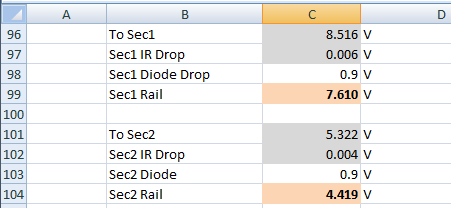
Figure 16. Output voltage section of the MAX13256 transformer design spreadsheet.
Two common secondary rectifier topologies are shown in Figure 3. For full-wave rectifiers, the output voltage reduces by two diode drops, whereas for push-pull rectifiers, only by one diode drop. Consult the diode data sheet to determine the expected forward bias drop per diode. If no diode has yet been chosen, enter a suggested default value from Table 1 into C98 and C103, and then later substitute for a closer value once a specific diode has been selected.
Note the results in cells C99 and C104. These are the calculated output voltages. Instead of 9V and 5V, we are getting 7.6Vand 4.4V. We need to increase the secondary turns to get these voltages up.
Adjust the actual number of secondary turns, in cells C36 and C37, until these voltages comfortably exceed the requirement. With 10 turns and 6 turns for the secondaries, we end up with 9.6Vand 5.4V. But now, cell D66 indicates OVERSTUFFED. Increasing the number of turns, in this case, results in too much wire in the window area of the core. Note the new suggestions from the spreadsheet in Figure 17.

Figure 17. New user wire suggestions.
No warnings show up in cells D35, D36, D37, D66, or D86. With a transformer with 22 turns of 24 gauge wire for the primary, 10 turns of 22 gauge wire for the 9Vsecondary, and 6 turns of 24 gauge wire for the 5V secondary, we can expect roughly 9.6Vout (cell C99) at 0.7A and 5.4Vout (cell C104) at 0.4A.
Cells E105, F105, and G105 estimate power dissipation. In this case, the MAX13256 dissipates about half a Watt, the transformer will dissipate about a fifth of a Watt, and the rectifying diodes will dissipate about a Watt.
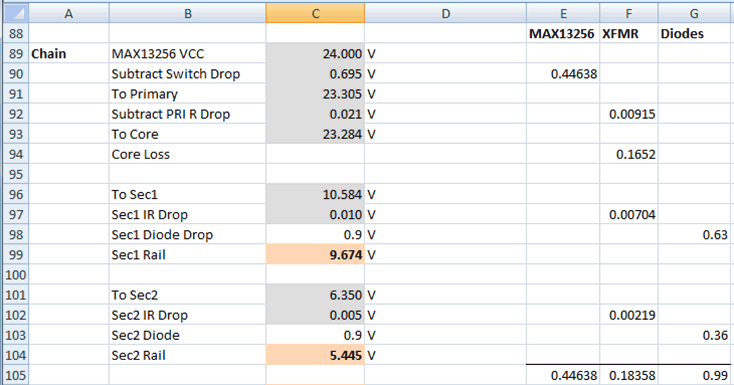
Figure 18. Revised output voltage section of the MAX13256 transformer design spreadsheet.
The ultimate step is to build the transformer, prototype the circuit on the bench, and verify that circuit operation is satisfactory. See Figure 18.
If you are considering a center tapped secondary, use this spreadsheet, ensuring that the secondary turns and secondary wire gauges match.
Conclusion
Because turns ratio figures prominently in determining output voltage, care must be taken to find a suitable transformer to work in your MAX13256 design. Besides finding a transformer designed specifically to work with the MAX13256, one might also find a standard product that meets your needs. Failing that, a custom transformer could be specified or designed. Armed with basic information and the simplified design procedure presented in this application note, you can quickly get from concept to an actual working circuit, ready to prototype and verify on the bench.
参考資料
- The data sheet for this transformer can be seen at: www.haloelectronics.com/pdf/smd5kv.pdf
- The data sheet for this transformer can be found at: www.coilcraft.com/pdfs/mintrans.pdf
- The data sheet for this material can be found at: https://www.tdk-electronics.tdk.com/en/374108/tech-library/articles/products---technologies/products---technologies/low-losses-at-high-frequencies/1206400
- The data sheet for this core can be found at: https://www.ferroxcube.com/upload/media/product/file/Pr_ds/EP13.pdf