Network Enable Your Old Computer Peripherals
Abstract
You can recycle old computer equipment by making it accessible through the Internet. This application note shows how to use a TINI® to network enable an old dot-matrix printer with only a parallel-port connection. The same protocol conversion techniques shown here can be used to tie many devices to the Internet.
Introduction
My wife was throwing out socks that only had two holes and shirts with tiny grass stains on them. I did not protest too much until she came to the old dot matrix printer. "You have not used the thing in years, and none of the computers we have can even talk to it," she said with disdain. Like any tech geek, I could not bear the thought of throwing away an old piece of computer equipment. My task was clear: make that printer useful again or lose it forever. I decided to make it accessible through the network, and luckily I had a TINI (Tiny INternet Interface) to do the job.
Connecting to the Network
TINI is an embedded networking platform from Maxim that runs on the Company's DS80C390, DS80C400, DS80C410, and DS80C411 microcontrollers. These are all enhanced 8051 microcontrollers with
The TINI platform supports a TCP/IP network stack (IPv4 and IPv6), memory manager, process scheduler, and plenty of communication protocols like I²C, SPI, and CAN. TINIs can be programmed in 8051 assembly language, C, or Java with familiar programming interfaces. The C runtime provides a Berkeley-style socket interface, and the Java runtime supports the core of the Java 1.1.8 API.
With plenty of IO support, a simple network interface, and lots of ways to program it, TINI makes a great protocol converter. This is exactly what I need to save my old printer: TINI will provide the network interface, and I will determine how to make TINI talk to the printer.
Hardware Configuration
For the brains of my system, I use a TINI evaluation (EV) kit. Based on the DS80C400 microcontroller, the EV kit has 1MB of flash, 1MB of RAM, and connectors for RS-232 and Ethernet communication. Its memory configuration is compatible with the TINI Java Runtime, although it can still be programmed in C and assembly as well. This gives me plenty of options for prototyping my printer interface and finalizing the application.
The printer in question is an Epson LX-800. Carbon dating and a thick layer of dust place it close to the days of vacuum tubes and hula-hoops. The LX-800 is a 9-pin printer, which refers to the number of pins in the print head, not the number of parallel signals it takes to drive it. I will actually need 17 signals to drive the printer (not including ground). Figure 1 shows the signals that are typically in a PC-printer parallel interface, and their arrangement in a 25-pin printer connector.

Figure 1. A 25-pin signal definition for the parallel printer interface.
As I am using a traditional 25-pin Centronics printer cable to connect from my TINI to the printer, I need to match the connections listed in Figure 1. There is, however, one problem: the TINI board's IO is inconvenient to be used as a wide parallel bus. There are only eight or nine general-purpose IO (GPIO) signals, about half of what I will need. These GPIO signals are also spread among several different registers. This GPIO signal limitation makes doing a simple write to the printer's 8-bit data bus inconvenient, since multiple register writes would be required to set eight output bits. Fortunately, the TINI socket board has pads and traces for adding a CPLD (Complex Programmable Logic Device) that will allow me to greatly expand my TINI's IO capability. Once the CPLD is down, I just need a header to program the CPLD (through a JTAG interface) and a header to provide access to some of the TINI pins.
CPLD Programming
Think of a CPLD as configurable hardware. It has a highly flexible internal structure that allows a wide variety of logical functions and state machines to be implemented. The TINI socket-board design includes space for a XILINX® CoolRunner®-II XC2C64 CPLD in a 100-pin VQFP package; other CoolRunner-IIs can be used if they have the same package and pinout. For this project I used the XC2C128, a larger capacity device with identical pinout.
The CPLD is connected to the TINI system through the DS80C400 microcontroller's external memory bus. To access the CPLD, the microcontroller simply needs to read or write to a special address:
  read_from_cpld:
       mov  dptr, #0C00000h       ; CPLD address
       movx a, @dptr              ; read from the device
The CPLD has a more complex task. On one side, it needs to respond correctly to TINI's external memory bus signals: reading values from the bus when TINI writes to it, and driving values onto the bus when TINI requests a read. On the printer side, the CPLD needs to read status signals (like BSY) that indicate what the printer is doing, and drive output signals (like the 8-bit data bus and the write strobe STR) to control the printer. Figure 2 shows the block diagram that the CPLD will implement.
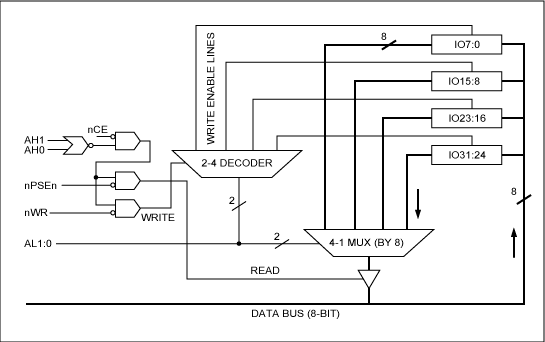
Figure 2. The CPLD must implement an interface between its own IO pins and the microcontroller's address bus.
The CPLD implements four 8-bit registers that correspond to 32 I/O pins on the CPLD. Register bits set to 0 will drive their corresponding output pins low, while register bits set to 1 will float high. Therefore, to read from an
All the input signals in Figure 2 come from the TINI's external memory bus. When TINI writes to the CPLD, the data bus contains the 8-bit value that TINI is trying to write. When TINI performs a read, the CPLD needs to drive the data bus with the input values that it senses. However, the CPLD cannot simply drive the data bus every time TINI requests any kind of read (i.e., every time nPSEN is active), since there are likely other devices sharing the bus. If the CPLD were to do so, TINI would fetch bad instructions or data, causing unpredictable system behavior (i.e., "Bad Things Happen."). Likewise, the CPLD should not react every time the TINI executes a write (i.e., every time nWr is active), since not all writes are intended for the CPLD. Therefore, the Read and Write signals in Figure 2 are qualified by address lines.
The CPLD is activated whenever address lines AH0 and AH1 (TINI's 16th and 17th address lines) are 0, and when the selected chip enable is active (in our case, we use chip enable 6). Since TINI is configured for 2MB per-chip enable, the base address for accessing the CPLD is 0xC00000 (2,097,152 × 6 = 12,582,912 = 0xC00000). Note that in my chosen configuration most of TINI's address lines are not specified in the interface between TINI and the CPLD. TINI's address lines A2 through A15, for example, can assume any value and still activate the CPLD. For simplicity, however, my source code always uses addresses 0xC00000 through 0xC00003 to access the four 8-bit registers.
The CPLD programming is specified by an HDL (Hardware Description Language). I used Xilinx WebPACK™ for the development and wrote the hardware description in Verilog™, with module definitions following that shown in Figure 2, i.e., there are separate modules for an 8-bit register, a multiplexer, and a decoder. The blocks and address decoding is performed in a top-level block.
After the CPLD was populated and programmed, and before connecting to the printer, I wanted to check to ensure that I really knew which signals were which. I created a little board with 4 LED banks tied to my four logical registers (IO7:0, IO15:8, IO23:16, and IO31:24), as in Figure 3. A simple program in C wrote increasing values to the 4 LED banks, with a pause in the middle so I could visually verify the program's operation. Confident that my CPLD programming and my understanding of the connections was correct, I brought the printer into the picture. Figure 3 shows the flying-wire connector from the TINI board to the 25-pin printer connector.

Figure 3. TINIs400 socket board connected to the Epson printer.
Talking to the Printer
My final goal was to use the printer without any special driver or client application. Or simply stated, I wanted to use the built-in print drivers and print dialogs in Windows® and make something happen on my ancient printer. The ultimate test of my application would be to print something from MS Word; if anything was wrong, I was sure that Word would reveal it. Meanwhile, although MS Word was my end goal, I wanted to take smaller steps to get there.
My first step was to write a small application that would send a few ASCII characters to the printer without any network connection. This approach would give me only one thing to debug at a time. Theoretically, the printer should simply print every character I sent it, as long as I stayed away from command codes and other non-ASCII characters. Like all good engineering projects, I was hopeful that this would go smoothly and quickly, and I could be on to determining the network interface very soon. Naturally, I was completely wrong.
I wrote my first printer application in C using the Keil Software® µVision®2 tool suite. From my readings in The Indispensable PC Hardware Book, it seemed that all I needed to do was initialize the printer and start writing characters.¹ Writing a character was a simple algorithm:
- Wait for BSY to become inactive.
- Set output values on the data bus.
- Set the write strobe STR to active.
- Wait for the ACK signal to acknowledge the data received.
- Set the write strobe STR to inactive.
- Rinse, repeat as desired.
012345678901234567890123456789...
I loaded the program onto the TINI and ran it. Instantly I knew that my printer initialization routine worked because I could hear the print head shifting as it went offline and back online. Several seconds later, though, nothing had printed. I reset the program and started to double- and triple-check my connections. Unfortunately I did not have a scope to monitor the status signals coming from the printer. Everything looked fine, so next I turned back to my trusty PC hardware guidebook. I read again and identified some confusion on the polarity of some of the signals. The traditional PC interface says, for example, that the BSY is active with a value of 0, although at the hardware level it is actually an active high. After several iterations of C programs with different inversions on different signals, the printer was still silent after its initialization. I made one more pass through my program to match the logic levels to the way that I thought the printer should behave. I ran it, and got nothing again.
I stepped away, when I heard it: the fierce, agitating sounds of a dot matrix printer as it banged out a line of text. I ran back and saw a beautiful line of printed characters, although the printer had again become completely still. Then a theory occurred to me: the printer buffers up until the end of a line, whether it reached the 80-character limit or I inserted an end-of-line sequence into the data stream. A few moments of work verified that theory. I was now printing simple text strings.
Implementing an LPD Daemon
The next day I decided to join the network to the printer interface. The simple answer was to create a custom application that simply received data from the network and output it to the printer. There is a problem with that approach: to make the printer work with MS Word, I would also need to write a windows printer driver—something that I could probably figure out, but not exactly my idea of fun. So I started to consider options where I would not be reinventing the wheel, and hopefully not learning all about the details of printer drivers.
My ideal design would have been a virtual parallel port. The idea here is that the virtual parallel port supplies the same interface as a normal parallel port, but at the driver level at which it would actually be sending and receiving data over the network to the TINI. Virtual ports and protocol converters like this are a common application for TINI, and I had some experience implementing virtual serial ports following the same idea. I had a hard time determining just how to implement this, since it seems that many applications write directly to a PC's parallel registers. My next option was to look at existing protocols. Based on a colleague's suggestion, I investigated RFC 1179, the line printer daemon (LPD) protocol.²
LPD was exactly what I needed. It is a network protocol commonly supported in the UNIX world, but usable in Windows with a few simple configuration steps. To install the driver, you tell Windows to install a new local printer attached to your computer, but instead of telling it which existing port to use, you create a new type of LPR Port. Here you can configure the name of the machine running the LPD server (my TINI's IP address in my case) and tell it the name of the print queue. (I only had one print queue named 'crusty', which I thought was appropriate for my printer.) Finally, you tell Windows what kind of printer you have (Epson LX-800, in my case).
The nice thing about this setup is that the Windows printer drivers automatically format all the data to print in the natural language of the printer: Epson ESC/P. I would not have to learn anything about the ESC/P language, nor would I have to parse any of the data arriving on TINI from the PC. In addition, a basic LPD server was very easy to implement; I implemented it in Java using a handful of native methods for accessing the memory mapped CPLD. The result was around 400 lines of real code, and the Java class files when prepared for TINI are only about 4kB. Note that I did not implement the whole LPD protocol, only the portions needed to print one file at a time.
Print Away
I thought that I needed to do three things to call the project complete: print from Notepad, print from MS Word, and then, if I felt really ambitious, print a small GIF or JPG file. After some debugging of my LPD server, I was happily printing files from Notepad. It did seem odd to me that a 2-line text file was sending about 5,000 bytes to TINI for printing. The reason was that the Windows driver was converting the entire file to ESC/P instructions to write a bitmapped image, rather than simply sending the ASCII characters. Nevertheless, printing from Notepad worked, so I moved on to MS Word.
Printing from MS Word was a bit more problematic. To make my test file interesting, I made every second or third word a different font, taking the opportunity to see some fonts I never saw before. When I printed, a lot of junk came out: the printer skipped several lines, printed out some strange ASCII graphics characters (something in the range from 0x80 to 0xFF), and made lots of beeping sounds. Eventually, some of the correct text appeared, but then more junk. After a few rounds of debugging and tracing through the ESC/P instructions being sent to TINI, I decided to try adding a delay to the escape characters. This made the program print correctly, but extremely slowly. After a bit more experimentation, I discovered that I only needed to delay when an end-of-line character was encountered. This happens so rarely that I did not really notice any delay.
Since printing in MS Word was moderately difficult, I decided that printing a GIF file would be nearly impossible, which turned out to not be the case. I only ran into one issue: the GIF file translated to ESC/P instructions was larger than 64k, which is the maximum dynamic buffer size supported on the version of TINI that I was using. However, TINI supports a file system that has no such limits, so I stored the incoming data in a file rather than a dynamic memory buffer. Once that change was made, I was able to print graphic files with no problems, only limited by the size of the RAM on my TINI.
Saving the Rest of Your (Obsolete?) Equipment
I gave my dot matrix printer a second lease on life. TINI had saved the day. Its easy-to-program stack made it a great choice to network enable a piece of legacy equipment. TINI's usefulness does not stop with connecting parallel devices to the network; support for CAN, SPI, I²C, RS-232, 1-Wire, and plenty of other communication busses make it a perfect choice for bridging networks to all kinds of legacy equipment. With software support for network protocols like DHCP, HTTP, FTP, Telnet, DNS, and more, there are many scalable ways to provide familiar means of access (like a webpage) to older equipment. TINI is a great choice when expensive, old equipment needs more accessibility. (New dot matrix printers will cost you around $400 these days!) So do not throw out your old junk. Save it with a TINI.
¹ Messmer, Hans-Peter, The Indispensable PC Hardware Book (Addison Wesley, 1994).
² RFC 1179: LPD Protocol www.faqs.org/rfcs/rfc1179.html
A similar article appeared online in Circuit Cellar, 192 (July, 2006).
About The Authors
Related to this Article
Products
Product Categories
{{modalTitle}}
{{modalDescription}}
{{dropdownTitle}}
- {{defaultSelectedText}} {{#each projectNames}}
- {{name}} {{/each}} {{#if newProjectText}}
-
{{newProjectText}}
{{/if}}
{{newProjectTitle}}
{{projectNameErrorText}}


