Getting started with MAX-IDE
Abstract
MAX-IDE is a fully functional application development and debugging environment for the MAXQ® family of microcontrollers. MAX-IDE is designed to work with all the standard MAXQ evaluation kits to provide a project-based development environment, access to standard MAXQ debugging features, an integrated macro assembler, and in-circuit application loading using the JTAG interface.
Overview
MAX-IDE is a fully functional, application development and debugging environment for the MAXQ family of microcontrollers. It works with all the standard MAXQ evaluation kits and provides the following features.
- Project-based development environment for MAXQ assembly applications
- Integrated MAXQ macro assembler, including standard header files for all MAXQ microcontrollers
- In-circuit application loading using the JTAG/TAP interface and ROM bootloader (for MAXQ microcontrollers with flash or EEPROM program memory)
- In-circuit debug features available over the JTAG/TAP interface include breakpointing, step-by-step program execution, and memory/register content viewing
Installing MAX-IDE
System requirements
- Operating system: Windows® 98, Windows NT, Windows 2000, Windows ME, or Windows XP®
- At least one free serial COM port (required to communicate with MAXQ evaluation kits), or a USB-to-serial adapter and a free USB port
Running the install program
- The installation package for MAX-IDE is MAX-IDE.zip.
- Download this package, unzip it, and run setup.exe to install MAX-IDE to your hard drive.
- In the InstallShield dialogs, select the Typical installation, which will install all files needed for MAXQ application development with your evaluation kit.
- Once the installation is complete, MAX-IDE may be launched from the Start menu.
MAX-IDE installed files
The main executable and help files for MAX-IDE are located in the MAX-IDE root directory, placed by default at {Program Files}\MAX-IDE. Additional files are located in the following subdirectories.
- The Compilers subdirectory contains executables and data files for all compilers and assemblers installed with MAX-IDE. At a minimum, this will include the standard MAXQ assembler; other assemblers and compilers may also be installed depending on the distribution you are using.
- The Devices subdirectory contains libraries, drivers, and configuration files to target applications for, and communicate with all MAXQ microcontrollers and evaluation kits.
The Examples subdirectory contains code samples (in <device directory>/xxx_Demo) and standard include files and libraries (in <device directory>/api) for all MAXQ microcontrollers.
Setting up the JTAG Interface
Serial-to-JTAG adapter board
MAX-IDE interfaces to the bootloader and debug engine functionality of MAXQ microcontorlllers over a dedicated JTAG Test Access Port (TAP) interface, which is compatible with the JTAG IEEE Standard 1149. This interface consists of the following signals, which are typically multiplexed with port pins: TMS (Test Mode Select), TCK (Test Clock), TDI (Test Data In), and TDO (Test Data Out).
Figure 1 illustrates how the Serial-to-JTAG adapter included with all MAXQ microcontroller evaluation kits provides an interface layer between the PC serial COM port and the JTAG interface of the MAXQ microcontroller.
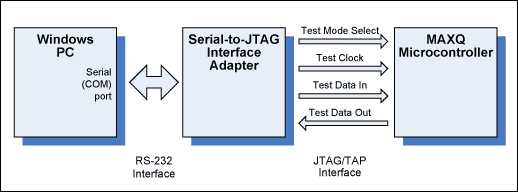
Figure 1. Serial-to-JTAG interface for MAXQ.
JTAG interface signals and cable
The Serial-to-JTAG adapter board connects to the MAXQ evaluation kit board through a 10-connector ribbon cable with a 2 × 5 0.100" spaced socket on each end. The signals carried by this cable are listed in Table 1 below.
| Pin number | Signal type | Signal name | Signal description |
| 1 | Input to MAXQ | TCK | JTAG/TAP test clock |
| 2 | Ground | GND | Ground |
| 3 | Output from MAXQ | TDO | JTAG/TAP test data out |
| 4 | Reference | VREF | Supplied by MAXQ kit to set the reference level for JTAG signals output by the Serial-to-JTAG board |
| 5 | Input to MAXQ | TMS | JTAG/TAP test mode select |
| 6 | Input to MAXQ | nRST | Open-drain drive, connected to MAXQ reset line |
| 7 | None | KEY | Keyed pin for JTAG cable alignment |
| 8 | Power | VCC5 | +5.0V (±5%) supply provided by JTAG board |
| 9 | Input to MAXQ | TDI | JTAG/TAP test data in |
| 10 | Ground | GND | Ground |
Connecting the evaluation kit
Depending on the type of evaluation kit being used, power supplies may be required by the Serial-to-JTAG interface board, the evaluation kit board, or both. Abbreviated instructions for setting up both boards are provided here (Table 2); refer to the evaluation kit data sheet for more detailed instructions. Note that all supplies used by either the Serial-to-JTAG board or any MAXQ evaluation kit board are DC only, center post positive.
| Evaluation kit | JTAG power supply | Kit power supply | Jumper settings | JTAG header |
| MAXQ2000 | 5V, ±5% | None | JTAG—Close JH1, JH2, JH3Kit—Close JU11; Close 1+2 on JU1, JU2, JU3 | J4 |
To set up the MAXQ evaluation kit and Serial-to-JTAG board (Figure 2) for use with MAX-IDE:
- Connect the power supply to the Serial-to-JTAG board as shown above.
- Set any jumpers for the evaluation kit and Serial-to-JTAG board as shown above. Additional jumper or DIP switch settings may need to be made on the evaluation kit board to access certain kit features; refer to the evaluation kit data sheet for more details.
- Connect the 2 × 5 10-connector ribbon cable from the P2 header on the Serial-to-JTAG board to the appropriate header on the evaluation kit board. The connectors may be keyed to connect in one orientation only; if they are not, verify that the red wire goes to the same pin on both headers.
- Connect a straight-through serial cable from J1 on the Serial-to-JTAG Board to the PC COM port.
- Turn all power supplies on.

Figure 2. MAXQ2000 evaluation kit and Serial-to-JTAG board.
Working with projects in MAX-IDE
Creating a new MAXQ assembly project
To create a new MAXQ assembly language project in MAX-IDE, follow these steps.
- From the MAX-IDE menu, select Device → MAXQ JTAG.
- Select Project → New Project. An untitled project will be created.
- Select Project → Save Project As. Select the location where you want to save your project (.prj file).
- To create a new assembly language file, select File → New File. After you have entered the assembly code into the file, select File → Save As, and save the newly created .asm file in your project directory. Next, select Project → Add Files, and select the newly created file to add to your project.
- To add an existing assembly language file to your project, simply select Project → Add Files, and select the file to be added to the project.
- Include files do not need to be formally added to the project, as they are read automatically during the assembly process.
An example assembly file for the MAXQ2000 would be:
$include (..\api\maxQ2000.inc)

org 0000h

main:
    jump  $

end
The $include line above will vary depending on the location of the include file. For more details on the $include and org directives, see the "Using the MAX-IDE Assembler" section of this document.
Notes on assembly and include files
- The system registers common to all MAXQ microcontrollers (such as the accumulators, data pointers, and loop control registers) are predefined in the MAX-IDE assembler. The peripheral registers, which are different for each device, must be defined in an include file. Standard include files are included with the MAX-IDE install for each MAXQ microcontroller; the include file shown in the above example is for the MAXQ2000.
- Preprocessor directives (such as equates, defines, and macros) do not carry over from file to file within a project. If a MAX-IDE assembly project contains more than one assembly file, any preprocessor directives or include file directives must be contained in each assembly file that uses them.
- Regardless of the number of assembly files in a project, an "end" statement must appear at the end of each file.
- Do not put "end" statements at the end of include files.
- When multiple assembly files are included in a project, all identifiers in all files are effectively public; that is, code in any assembly file may call routines or refer to labels defined in any other assembly file in that project.
Opening an existing project
To open a previously created MAX-IDE project, simply select Project → Open Project from the menu and select the .prj file of the project you wish to open. Note that opening a MAXQ JTAG project when the Serial-to-JTAG board and evaluation kit board are not connected correctly and powered up, may result in an error message.
Once a project has been created or opened, assembly code files included in the project will be listed in the panel on the left. Double-clicking on a file name will open it for editing in MAX-IDE, as shown in Figure 3 below.

Figure 3. The MAX-IDE project environment.
Executing and debugging code
Compiling a project
To compile project files, select Debug → Make or Debug → Build All from the menu, click one of the shortcut buttons for these commands on the toolbar, or press F7 (same as Make). The MAXQ assembler will run; if there are no errors, the message "Compiling...Build Successful." will be displayed in the Messages window. Any errors from the build will also be displayed in the Messages window.
Running a project
Once a project has been successfully compiled, it can be executed in the debugger using one of several methods.
- Selecting Debug → Run (F5) will load the compiled project code into the MAXQ microcontroller over the JTAG interface and start execution. Program execution will continue until Debug → Stop (Shift+F5) is selected, the Pause button is clicked, or a breakpoint is encountered.
- Selecting Debug → Step Into (F11) will load the compiled program and halt execution at the first source-code line.
- Selecting Debug → Run to Cursor (Control+F10) will load the compiled program, start execution, and run until the execution point reaches the line that the editing cursor occupies or until it reaches a breakpoint, whichever occurs first. If the cursor is not on a source-code line, selecting this option will result in an error.
Breakpoints, which halt program execution at a predetermined location, can be set or cleared by one of three methods.
- Move the cursor to the line you wish to breakpoint and select Debug → Toggle Breakpoint.
- Move the cursor to the line you wish to breakpoint and click the stoplight icon in the toolbar.
- Click the line number of the line you wish to breakpoint in the editing window.
Note that a breakpoint can be placed on a nonsource code line, but this will have no effect. MAXQ microcontrollers allow up to four breakpoints to be set at once; if Run to Cursor is selected, this uses up a breakpoint, so only three may be set in this case.
Selecting Debug → Stop or clicking the Stop icon in the toolbar shuts down program execution completely. However, when execution stops at the first line (Step Into), at the cursor line (Run to Cursor), or at a line with a breakpoint set, the program may then be executed in step-by-step mode. Step-by-step mode may also be entered by clicking the Pause button. In this mode, the current execution point is marked with a green arrow, and the following commands may be used.
- Debug → Step Into (F11), Debug → Step Over (F10), and Debug → Step Out (Shift+F10) all have the same effect in assembly debug mode, which is to execute a single instruction and move the execution point to the next instruction.
- Debug → Run will run from the current execution point until the next breakpoint is reached, as described above.
- Debug → Run To Cursor will run from the current execution point until the cursor line is reached, as described above.
Note that the High-Level Debug and Low-Level Debug settings in the Debug menu have no effect when running in assembly-language debugging mode.
Displaying and editing processor registers
Once a program has been loaded and has executed at least one instruction, the MAXQ microcontroller's registers may be viewed and edited using the debugger. Selecting Window → Show → Registers brings up a display of the register set. These values will update as you step through code in the debugger. Writeable registers may be edited by double-clicking in their value fields and entering new values in hex, decimal, or binary.
MAXQ2000 kit note: If the LCD daughterboard is attached, do not edit the values of the registers PO0, PD0, PO1, PD1, PO2, PD2, PO3, or PD3 manually. Setting these pin outputs to static values with the LCD attached may damage the LCD display.
Displaying and Editing Processor Memory
Once a program has been loaded and has executed at least one instruction, the MAXQ microcontroller's internal memories may be viewed and edited. Selecting Window → Show → Memory brings up a display of internal memory. You can view code, data, or stack memory by selecting from the drop-down list on the display. Memory is displayed in 16-bit width for code and stack space, and 8-bit width in data space. Memory values in data or stack space may be edited by double-clicking on a memory location and entering a new value.
Using the MAX-IDE assembler
MAX-IDE provides a multipass assembler which can be used to develop applications in MAXQ assembly language. This assembler includes a single-pass preprocessor which provides the capability to use include files, symbolic equates, conditional assembly, and macros. The assembler and preprocessor are fully integrated with the MAX-IDE environment.
For an example of how to use macros and other preprocessor directives, refer to the 'Macro' example project.
General syntax
The MAXQ assembler and the preprocessor are both case insensitive. Assembly statements follow the format:
[label:] [opcode [parameter [, parameter]]] [;comment]
as shown in the following example code:
main:
move   Acc, A[2]             ; copy A[2] to active accumulator
Identifiers, such as the 'main' label shown above, may include the characters [a-zA-Z_?$0-9], but they may not begin with a 0-9 digit. They may be up to 127 characters in length.
Refer to the MAXQ Family User's Guide for a detailed description of the architecture, instruction set, addressing modes, and core registers of the MAXQ microcontroller family.
Source files
All assembly source (.asm) files listed in the project window of MAX-IDE will be assembled when the project is compiled, in the order in which they are shown in the window. No linker is provided, so multiple files are assembled in the same manner as they would be if they were merged into a single file and then assembled.
Source files may contain include directives, equates/defines, macros, conditional assembly blocks, and statements. The last line of any source file must consist of the END directive:
end
Include files
Include (.inc) files do not need to be added explicitly to a project. Instead, they are read in and parsed automatically by means of include directives, which cause the include file to be parsed as if all its text had appeared in the source file in place of the include directive.
(source file):                        (equates.inc):
$include(equates.inc)        --->     MASK1  equ  0FFh
                                      MASK2  equ  0FEh
(resume parsing in source    <---
file)
Include files may contain include directives, equates, macros, and DB/DW data statements, but they may not contain assembly routines. Include files do not need to end with the END directive.
MAX-IDE provides a standard include file for each MAXQ microcontroller which defines that microcontroller's peripheral register set as well as addresses for functions provided by the utility ROM. These include files are available for use in all assembly language projects; they are found in the Examples subdirectory under the main MAX-IDE install directory.
Constants
Constant numeric values for use as immediate values in statements or equate definitions can be written in one of four formats.
- Decimal (default)—ends with no character or with 'd'. Examples: 10, 07d
- Binary—ends with 'b'. Examples: 01b, 1101101b
- Hex—begins with a 0-9 digit and ends with 'h'. Examples: 10h, 09FFEh
- Single character—converted to byte ASCII value. Example: 'A'
The following operators may also be used in constants and equate definitions only; evaluation of these statements is performed in the preprocessing stage, before the constant value is parsed.
   move    Acc, #(1+1)         ; 2 : Addition
   move    Acc, #(4-1)         ; 3 : Subtraction
   move    Acc, #(2*2)         ; 4 : Multiplication
   move    Acc, #(25/5)        ; 5 : Division (truncated to integer)

   move    Acc, #(MIN(6,7))    ; 6 : Minimum of two values
   move    Acc, #(MAX(6, 7))   ; 7 : Maximum of two values
   move    Acc, #'A'           ; ASCII value of 'A'

   move    Acc, #(550h | 055h) ; 555h  : Logical OR
   move    Acc, #(550h & 055h) ; 050h  : Logical AND
   move    Acc, #(550h ^ 055h) ; 505h  : Logical XOR
   move    Acc, HIGH(#1234h)   ; 12h   : Select high byte of word
   move    Acc, LOW(#1234h)    ; 34h   : Select low byte of word
   move    Acc, NOT(#0000h)    ; FFFFh : Bitwise negation
   move    Acc, #001h << 7     ; 080h  : Shift left
   move    Acc, #080h >> 7     ; 001h  : Shift right
Equates
Equates, defined using the EQU directive, are used for numeric replacement in any place that a constant value would normally be used. They may use all the formats and constant operators defined above for constants. Labels are not recognized as constants.
ONE equ 01
TWO equ 02

   move    Acc, #ONE
   move    Acc, #(ONE+TWO)
Equates may also be used in the definitions of subsequent equates.
ONE equ 01
TWO equ ONE+ONE
Defines
Defines allow straight C-style text replacement with no additional processing, and are most commonly used in include files to define peripheral registers. Replacement text is limited to a single line; there is no recognized continuation character. C-style macros are not recognized.
#define PO[0] M0[0]

move    Acc, PO[0]           ; Parses as 'move Acc, M0[0]'
Data keywords
The DB and DW directives can be used to insert raw bytes (including bytes from a string value) or words into the hex file at the current location.
db   055h, 0AAh, 055h, 0AAh    ; byte values
dw   0AAAAh, 05555h            ; word values
db   "MAX-IDE Environment "    ; byte value for each char (padded to even count)
Note that these data values will be inserted in code space. Consequently, if a DB statement occurs between two sets of instruction statements, the number of bytes defined must be even to prevent a word-alignment assembly error.
Conditional assembly
Conditional statements allow blocks of code to be assembled only if a certain boolean condition is met. They have the following form.
IF (<boolean statement>)
   statements
   ...
ENDIF
Boolean statements are defined using constants, equates, and the following boolean operators: =, !=, <, <=, >, and >=. Only code and include statements may be used within a conditional assembly block—no macros or equates.
DEBUG equ 0
DOINC equ 1

IF (DEBUG != 0)
   call RoutineDbg
ENDIF

IF (DEBUG = 0)
   call Routine
ENDIF

IF (DOINC = 1)
$include(defines.inc)
ENDIF
Macros
Macros allow functions to be defined using blocks of code that are expanded inline and assembled each time a function is called. They have the following form.
<identifier> MACRO [[PARAM <parm1>] [whitespace AND/OR comma] [<parm2>] ...]
[LOCAL <local1> [whitespace AND/OR comma] [<local2>] ...]
<macro assembly statements, local labels>
...
ENDM
The simplest type of macro does nothing more than insert its code each time it is referenced. Equates, defines, and nested macro calls within the inserted code are all processed normally.
ThreeNops MACRO
   nop
   nop
   nop
ENDM

ThreeNops        -->      nop
                          nop
                          nop
Macros may optionally define one or more parameters, which are values passed when the macro is referenced. These values are pasted into the expanded code. The following macro uses a parameter to provide an 'INC' function for any writeable register (except Acc) at the cost of one level of stack space.
Inc MACRO PARAM Register
   push    Acc
   move    Acc, Register
   add     #1
   move    Register, Acc
   pop     Acc
ENDM

Inc LC[0]        -->         push Acc
                             move Acc, LC[0]
                             add  #1
                             move LC[0], Acc
                             pop  Acc
Macros may also contain local identifiers, which are renamed in the expanded code so that they are unique in each reference of the macro.
LoopN MACRO PARAM Count
LOCAL L1
   move    LC[0], Count
L1:
   djnz    LC[0], L1
ENDM
In the macro above, the 'L1' label will be renamed to a different temporary value each time the macro is referenced and its code inserted.
References
For more details, see the MAXQ2000 Evaluation Kit data sheet which is included on your evaluation kit CD or available online.